

Wenn die Temperaturen steigen und der Strand ruft, ist es Zeit, die Flip-Flops anzuziehen. Aber Moment, vergessen wir nicht die eine Sache, die im Sommer ein Muss ist? Genau! Deine Nägel! Doch was lässt deine Hände im Sommer hervorstechen, während du eine eiskalte Limonade hältst? Werfen wir einen Blick auf einige angesagte Designs, die für die Sommersaison geeignet sind.
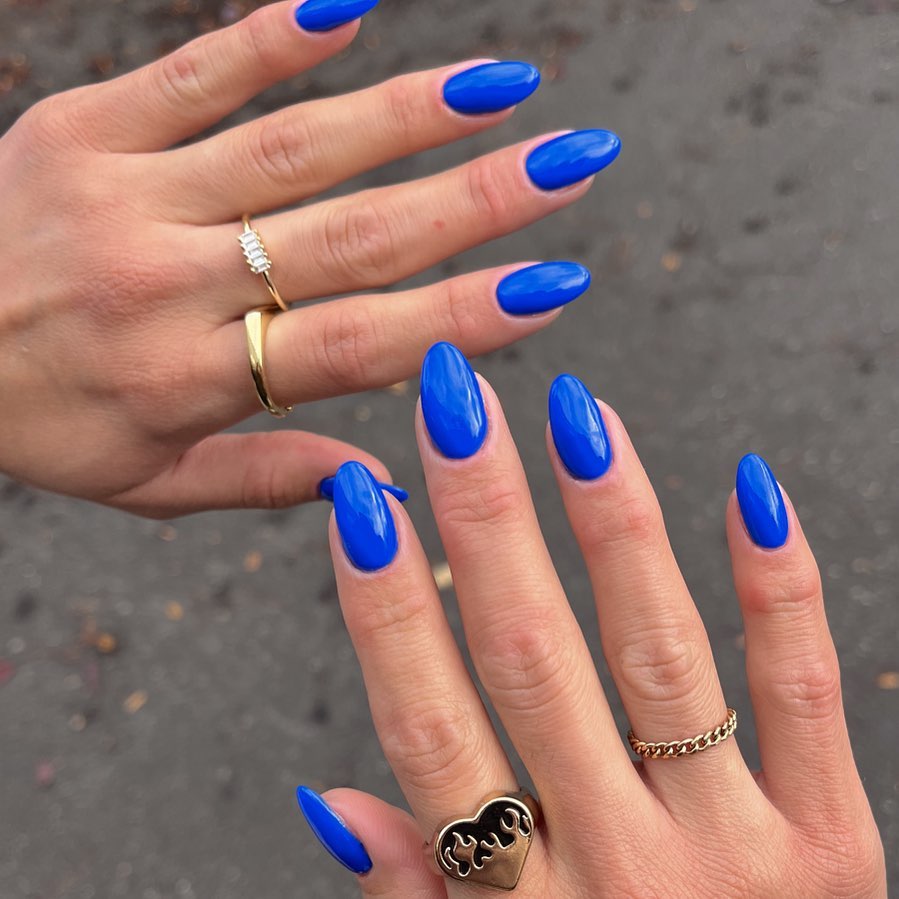
Elektrisches Blau – Eleganz
Diese ovalen Nägel bieten einen klassischen Hintergrund für den gewagten blauen Lack. Seine atemberaubende Farbe entspricht der eines klaren Sommerhimmels oder tiefen Ozeans und ist daher ideal für Strand- oder Poolpartys. Das Hochglanz-Finish macht sie zu einer einzigartigen und anspruchsvollen Option für alle, die diesen Sommer Eindruck machen wollen.
- Foundation: OPI Natural Nail Base Coat
- Polish: Essie Butler Please
- Finishing coat: Seche Vite Dry Fast Top Coat
Der Grund für die Auswahl dieser Produkte liegt in ihrer langen Haltbarkeit und den tiefen Farbtönen, die Ihre Maniküre während aller Sommerabenteuer bewahren.
Beginnen Sie, indem Sie Ihre Nägel reinigen und mit einer Nagelfeile kürzen. Tragen Sie einen Unterlack zum Schutz der Nägel und für eine glatte Oberfläche auf. Nachdem er getrocknet ist, tragen Sie zwei Schichten von Essie’s Butler Please auf und lassen Sie jede Schicht vollständig trocknen. Bedecken Sie Ihre Nägel abschließend mit einem Überlack, um ihnen einen glänzenden Look zu verleihen und sie vor Beschädigungen zu schützen! Voilà! Ihre sommerlichen Nägel sind bereit.
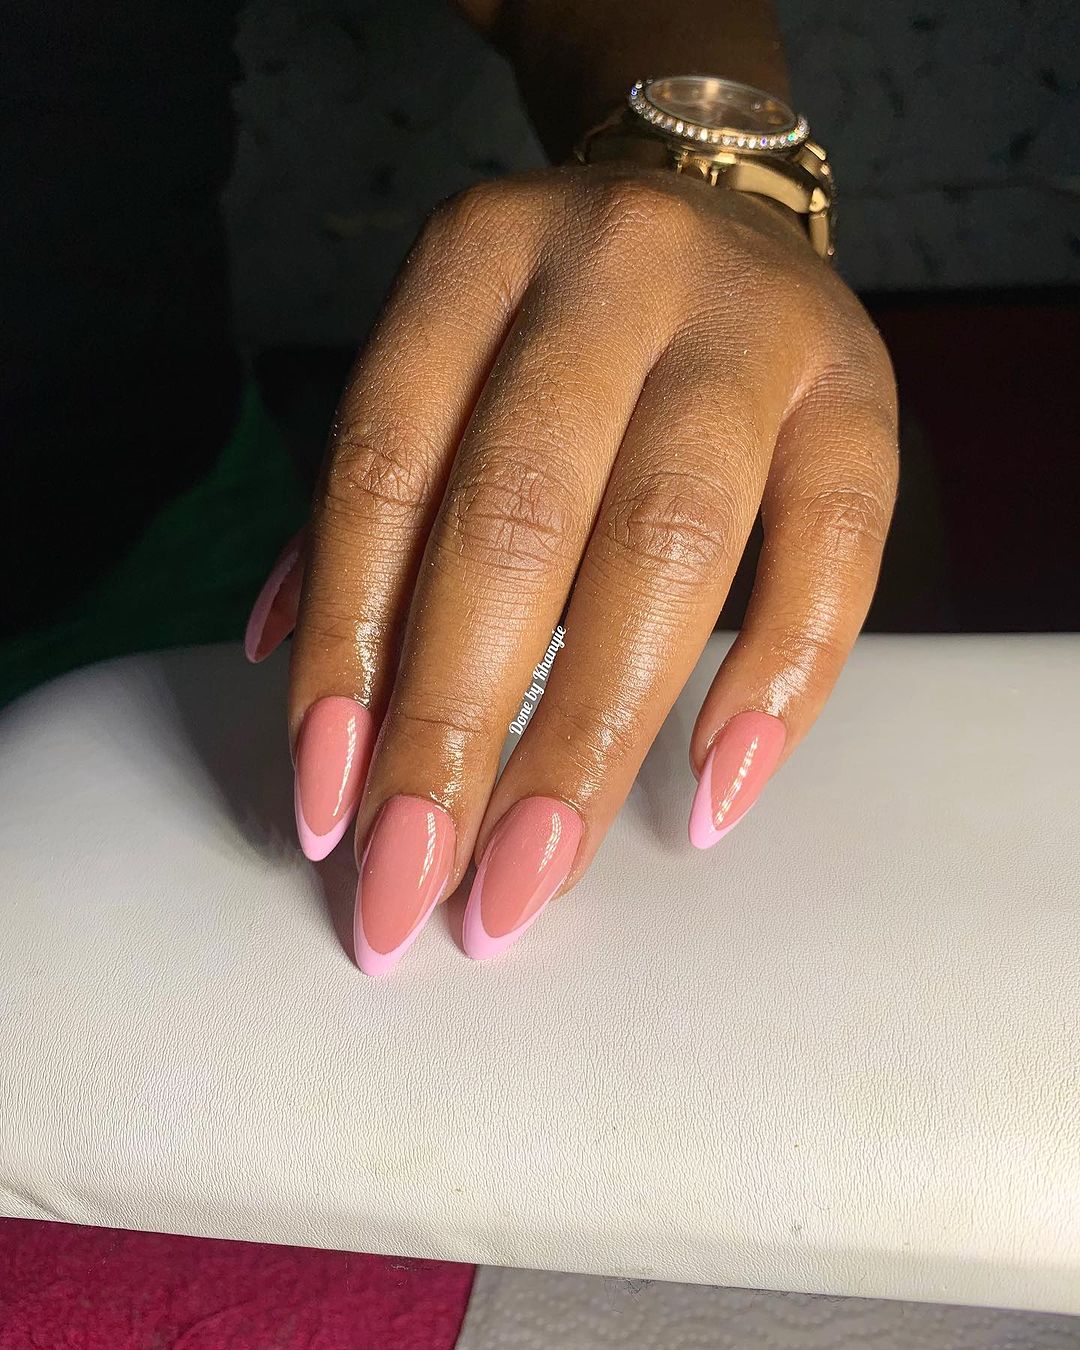
Dezentes Rosa – Raffinesse
Dieses Nageldesign ist der Inbegriff unaufdringlicher Raffinesse. Der hellrosa Farbton fügt sich harmonisch in eine neutrale Palette ein und passt somit zu jedem Sommerkleid. Es ist einfach hübsch und demonstriert das Sprichwort “weniger ist mehr”. Die ovale Form verleiht ihm einen femininen Touch, der sowohl modern als auch zeitlos ist.
- Base Coat: CND Sticky Base Coat
- Polish: OPI Bubble Bath
- Top Coat: Sally Hansen Insta-Dri Anti Chip Top Coat
Diese Mischung ergibt ein mattes Finish mit gerade genug Glanz für Sommerabende oder gemütliche Brunchs mit Freunden.
Um sicherzustellen, dass Ihre Maniküre lange hält, tragen Sie zuerst einen Unterlack auf Ihre Nägel auf. Tragen Sie zwei dünne Schichten OPI Bubble Bath auf, um eine gleichmäßige Deckkraft ohne Streifen zu erzielen. Versiegeln Sie abschließend mit einem Überlack für einen glänzenden Schimmer bis zur nächsten Maniküre. Lassen Sie sich Zeit, damit Sie nicht alles durch Verschmieren ruinieren!
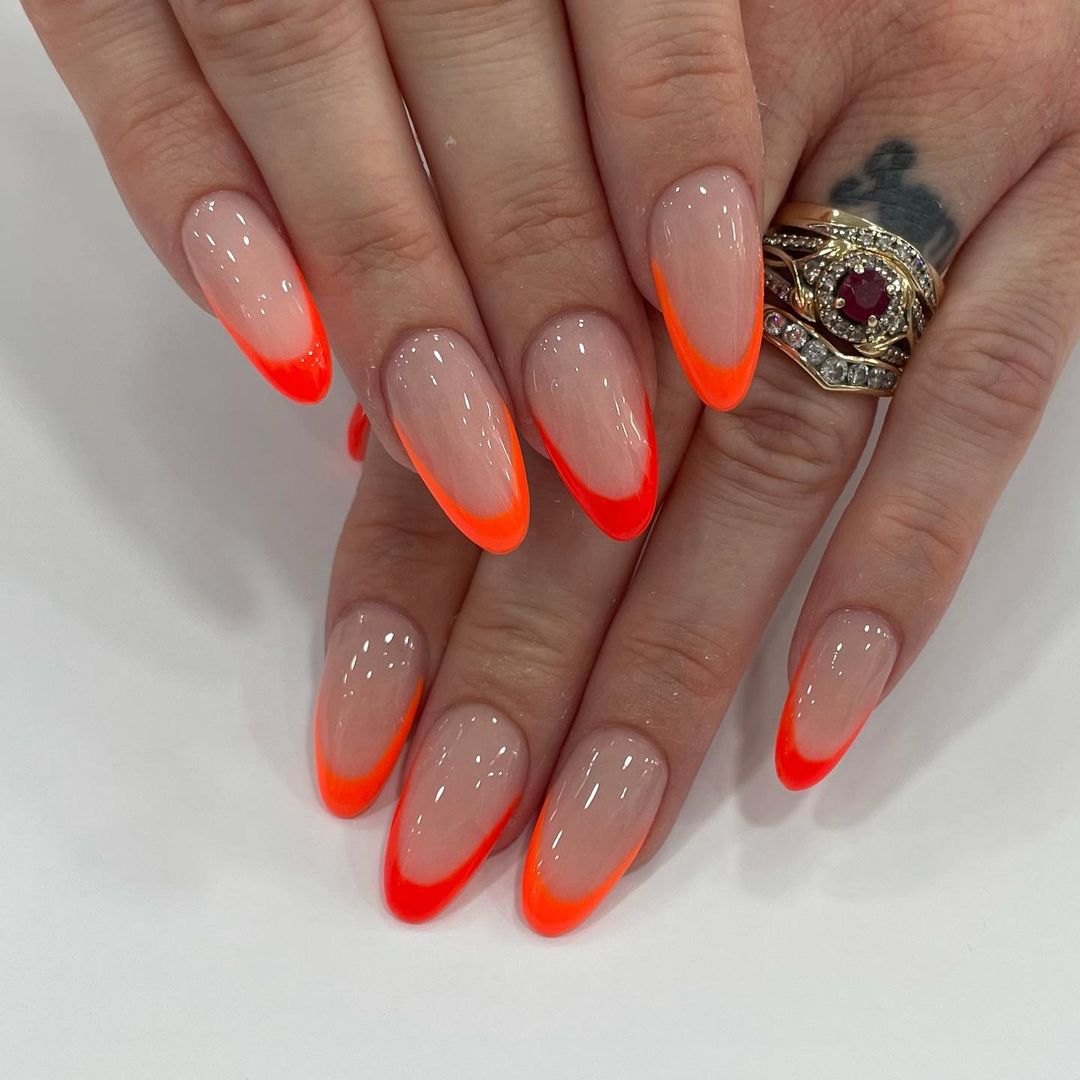
Neon-Orange – Flair
Der Übergang von zartem Pfirsich zu leuchtendem Neonorange simuliert den beeindruckenden Sonnenuntergang des Sommers. Der Ombré-Effekt ist verspielt, aber elegant und kann auf jeder Sommerparty ein fantastischer Gesprächsstoff sein. Der Glanz verleiht ihm ein saftiges Aussehen, das an reife Früchte erinnert, die an einem heißen Sommertag verzehrt werden wollen.
- Base Coat: Orly Bonder Rubberized Basecoat
- Polish: China Glaze Flip Flop Fantasy & Orly White Tips
- Top Coat: Essie Gel Setter Top Coat
Der Gel Setter Top Coat bietet die Haltbarkeit eines Gels mit der einfachen Anwendung eines normalen Nagellacks.
Beginnen Sie mit weißem Nagellack unter Ihren anderen Farben, damit diese "knallen". Wenn der Lack trocken ist, tragen Sie mit einem Schwamm leuchtendes Orange auf, das mit gerade genug Weiß für einen Farbverlaufseffekt gemischt wurde. Zum Schluss tragen Sie eine großzügige Menge Überlack auf, um den perfekten Sommerglanz zu erzielen.
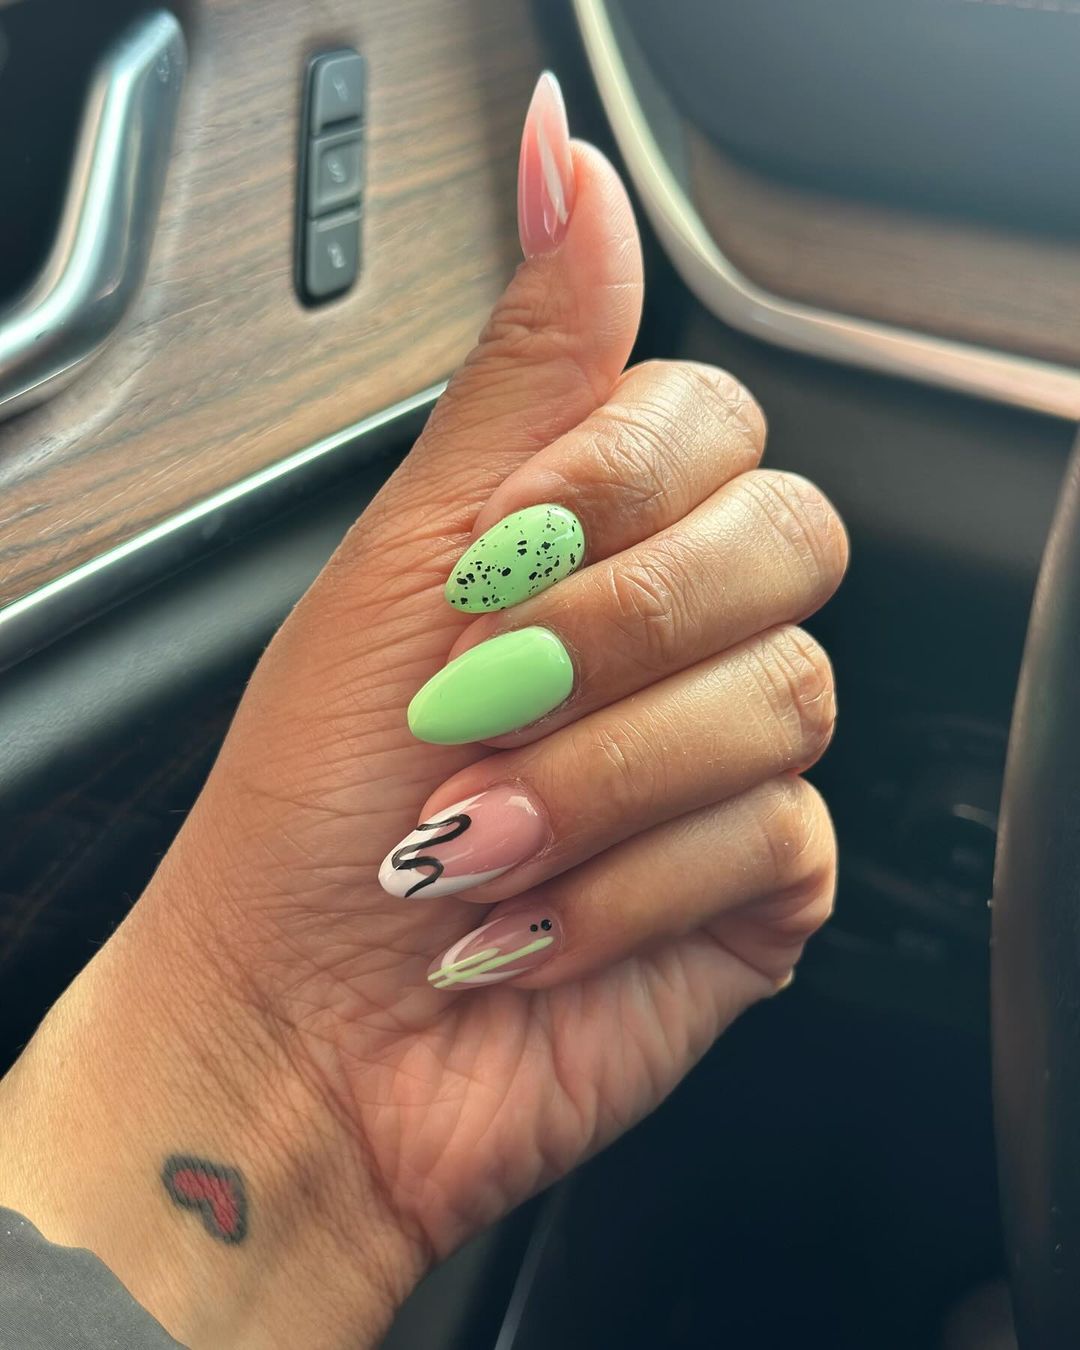
Künstlerisches Multi-Design-Medley
Eine Vielzahl von Designs wurde verwendet, um eine lebendige und abwechslungsreiche Herangehensweise an die Nagelkunst zu präsentieren, die die Essenz eines verspielten Sommers perfekt einfängt. Von leuchtendem Grün mit Sprenkeln über kreative Wellenmuster bis hin zu Rosa mit minimalen künstlerischen Details ist jeder Nagel ein Unikat, das zusammen eine dreidimensionale, lustige Maniküre ergibt.
- Essie Here To Stay Base Coat: Base coat
- OPI Gargantuan Green Grape: Green polish
- Sally Hansen Big Matte Top Coat with OPI Black Onyx dots: Black speckle top coat
- OPI Pink-ing Of You: Pink polish
- Fine-tip brushes and dotting tools: Detailing tools
Die ausgewählten Lacke bieten farbenfrohe Nuancen, während der Überlack und die Detaillierungswerkzeuge dazu beitragen, diesen Look präzise zu kreieren.
Tragen Sie einen Unterlack auf, bevor Sie jeden Nagel in einer bestimmten Farbe lackieren. Für den gesprenkelten Nagel nehmen Sie einen dünnen Pinsel und tragen Sie vorsichtig etwas schwarzen Nagellack auf. Verwenden Sie einen dünnen Pinsel für Wellen und detaillierte Kunst oder verwenden Sie etwas anderes, um Kreise zu malen. Versiegeln Sie abschließend mit Ihrem bevorzugten glänzenden oder matten Überlack.
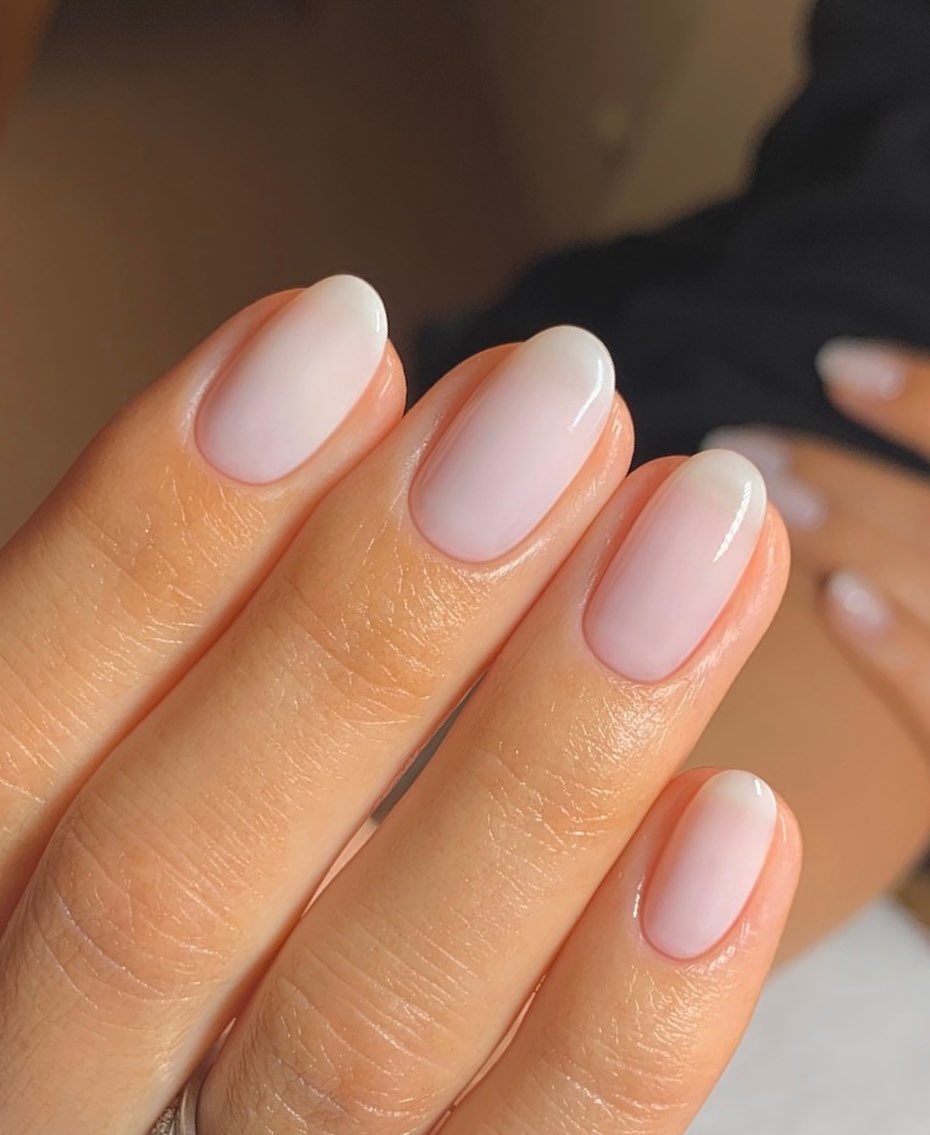
Klassisches French Fade
Hier verschmelzen die weißen Spitzen einer French Manicure mit der natürlichen rosa Basis. Dieses Design ist nicht schwierig, aber es sieht so schön aus, ideal sowohl für einen lässigen Sommertag als auch für ein Abendessen zu besonderen Anlässen. Der Glanz verstärkt den neutralen Ton des Designs und lässt es edler und eleganter wirken.
- Base Coat: Deborah Lippmann All About That Base
- White Polish: China Glaze White on White
- Pink Polish: OPI Bubble Bath
- Top Coat: INM Out The Door Top Coat
Die Produkte bilden eine perfekte Kombination für eine einfache Mischung mit Hochglanz-Finish, die schnell trocknet.
Tragen Sie den Unterlack gefolgt von dünn aufgetragenem rosa Lack auf. Tupfen Sie mit einem Schwamm weißen Lack auf die Spitzen und verblenden Sie ihn sanft mit dem Rosa für einen Ombré-Effekt. Abschließend mit Überlack für eine glatte, glänzende Oberfläche versiegeln.
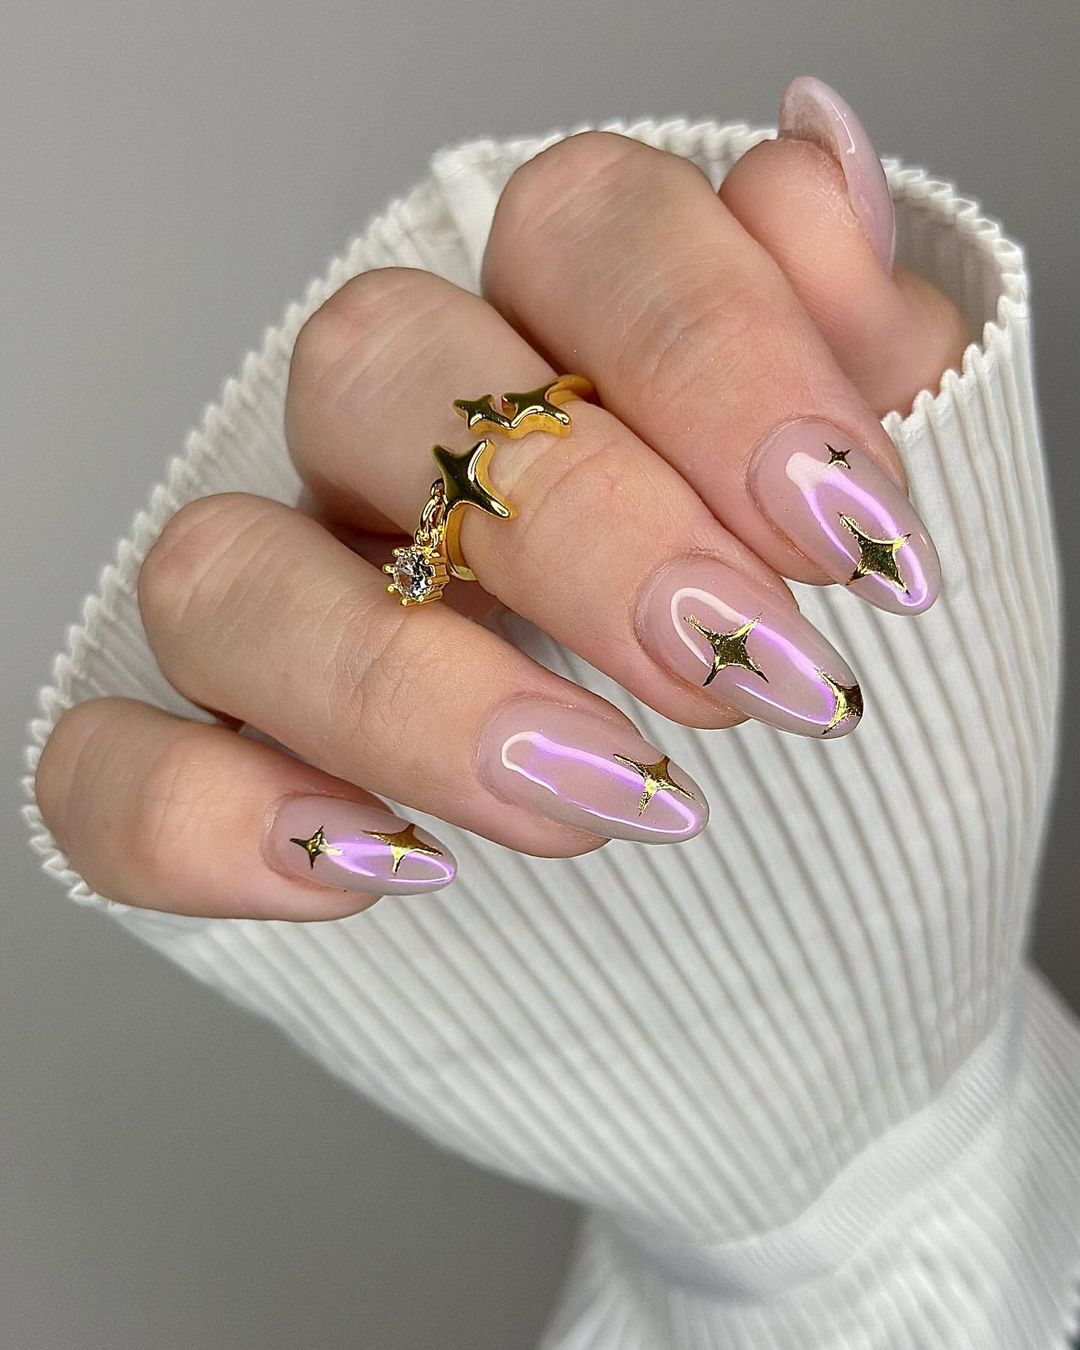
Lavendel-Luxus mit goldenen Akzenten
Dieses Design hebt sommerliche ovale Nageldesigns und Farbideen auf ein völlig neues Niveau. Die lavendelfarbene Basis wirkt beruhigend und sieht auf neutraler Haut toll aus, während goldene Akzente ihm einen luxuriösen Touch verleihen. Es bietet die richtige Balance zwischen Understatement und Glamour für den Sommer.
- ORLY Bonder Base Coat
- Essie Go Ginza – Lavender Polish
- Kiss Gold Stripe Nail Art – Gold Stripe Stickers
China Glaze No Chip Top Coat – Top Coat. Diese Kombination stellt sicher, dass Ihre Pastellbasis und die goldenen Akzente intakt bleiben, egal ob Sie an den Strand gehen oder einen Sommerabend mit Freunden genießen.
Nach dem Auftragen eines Unterlacks sollten zwei Schichten des lavendelfarbenen Lacks aufgetragen werden. Wenn der Lack trocken ist, bringen Sie goldene Streifenaufkleber auf den Nägeln an oder verwenden Sie einen dünnen Pinsel, um nach Wunsch goldenen Lack aufzutragen. Um ein lang anhaltendes glänzendes Finish zu gewährleisten, tragen Sie wie oben beschrieben einen Überlack auf, um das Design zu versiegeln.
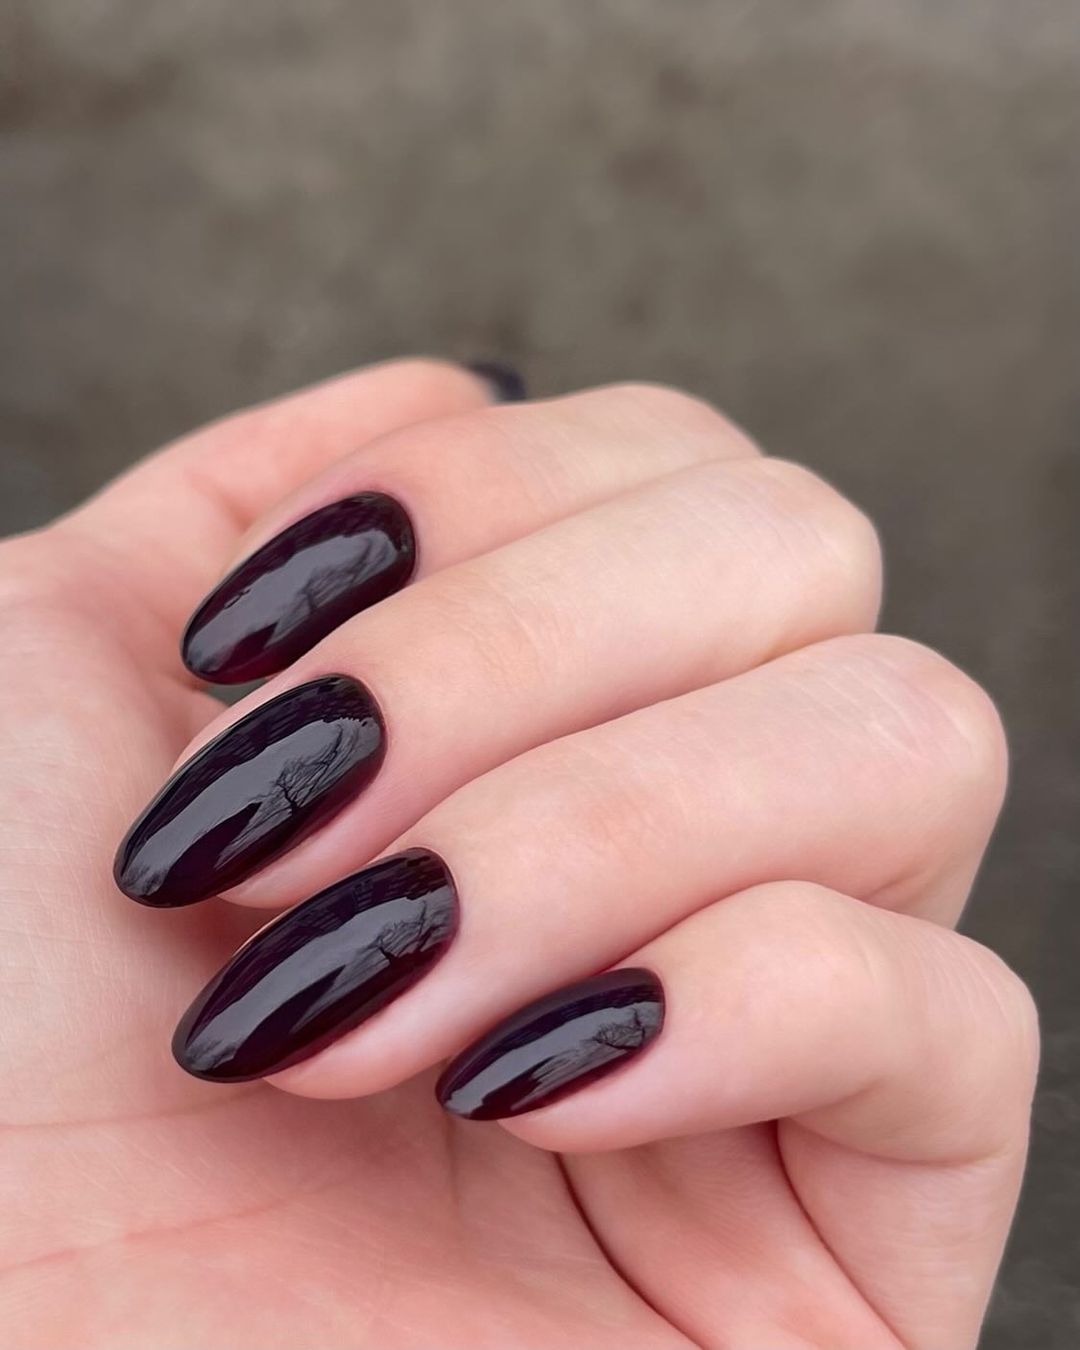
Tiefes Pflaumen-Lila - Brillanz
Der satte, dunkle Pflaumenton wird mit Raffinesse und Geheimnis assoziiert. Eine neue Interpretation des traditionellen dunklen Farbtons mit einem glänzenden Finish, das ihn modern macht und denjenigen, die gewagte Farben lieben, die Möglichkeit gibt, sich auszudrücken. Im Sommer getragen, kontrastiert diese Farbe wunderbar mit helleren Farbtönen und wird zu einer einzigartigen Wahl, die hervorsticht.
- Base coat: OPI Natural Nail Base Coat
- Plum Polish: Bahama mama by Essie
- Top coat: Sally Hansen Insta-Dri Top Coat
Beginnen Sie zum Schutz Ihrer Nägel mit einem soliden Unterlack. Tragen Sie zwei Schichten Pflaumenlack auf und lassen Sie sie zwischen den einzelnen Anwendungen trocknen. Tragen Sie abschließend einen schnell trocknenden Überlack auf, um eine starke, glänzende Oberfläche zu erzeugen, die ebenso haltbar wie atemberaubend ist.
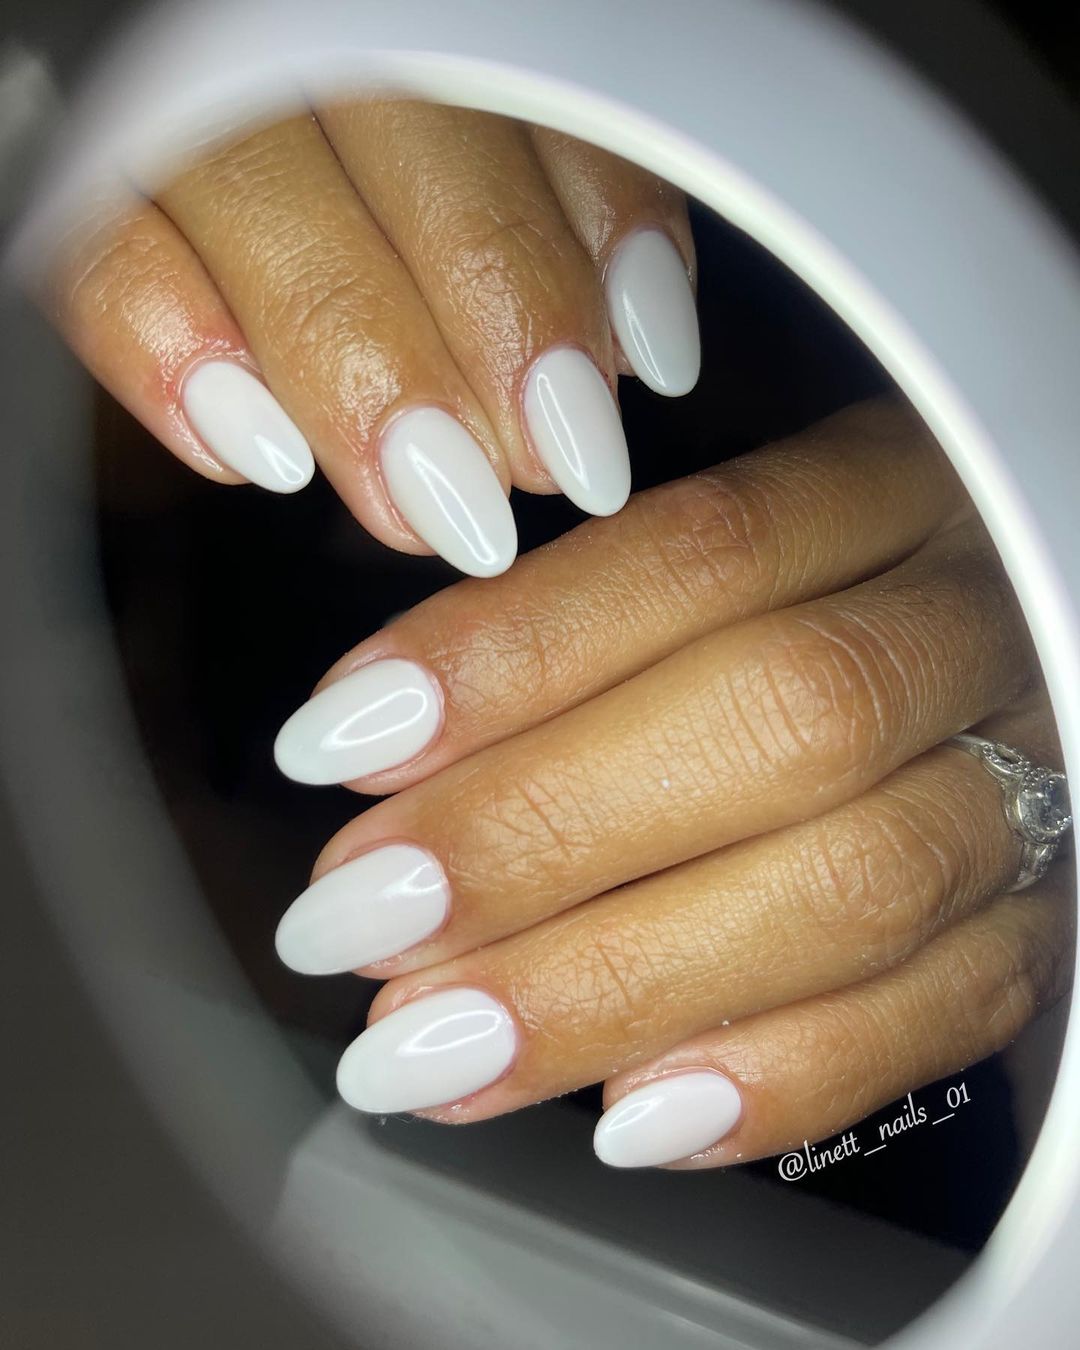
Der weiße Farbton ist ruhig, aber auch elegant. Als Sommer-Must-have passt er zu allen Farben Ihrer Kleidung für warmes Wetter. Die ovale Form und die kurze Länge machen das Design praktisch für die Sommerpause - pflegeleicht und immer im Trend.
Klares Weiß - Charme
Diese Produkte wurden aufgrund ihrer reinweißen Farbe und Haltbarkeit ausgewählt, d. h. sie splittern nicht so leicht ab.
- Bottom Layer: Zoya Anchor Bottom Layer
- White Polish: OPI Alpine Snow
- Cover Coat: Essie Gel Setter Cover Coat
Beginnen Sie mit dem Auftragen von Zoya Anchor Base Coat auf saubere, gefeilte Nägel. Tragen Sie zwei Schichten OPI Alpine Snow für ein deckendes, weißes Finish auf und versiegeln Sie es nach dem Trocknen mit Essie Gel Setter für einen glänzenden und dennoch robusten Look.
Für alle, die gerne etwas Liebe in ihren Stil mischen, ist dieses Design das Beste. Die neutrale Nagelfarbe mit Roségoldblatt und ein paar winzigen roten Schmucksteinen ist sowohl exklusiv als auch elegant und reflektiert das warme goldene Licht der Abenddämmerung am Strand. Dies ist eine Wahl, die anspruchsvoll und dennoch einfach ist und in ihrer Ruhe alles sagt.
Romantisches Roségold
Ausgewählt wegen ihrer hervorragenden Qualität und Haltbarkeit, kreieren diese Materialien ein zartes Nageldesign, das genauso robust ist, wie es aussieht.
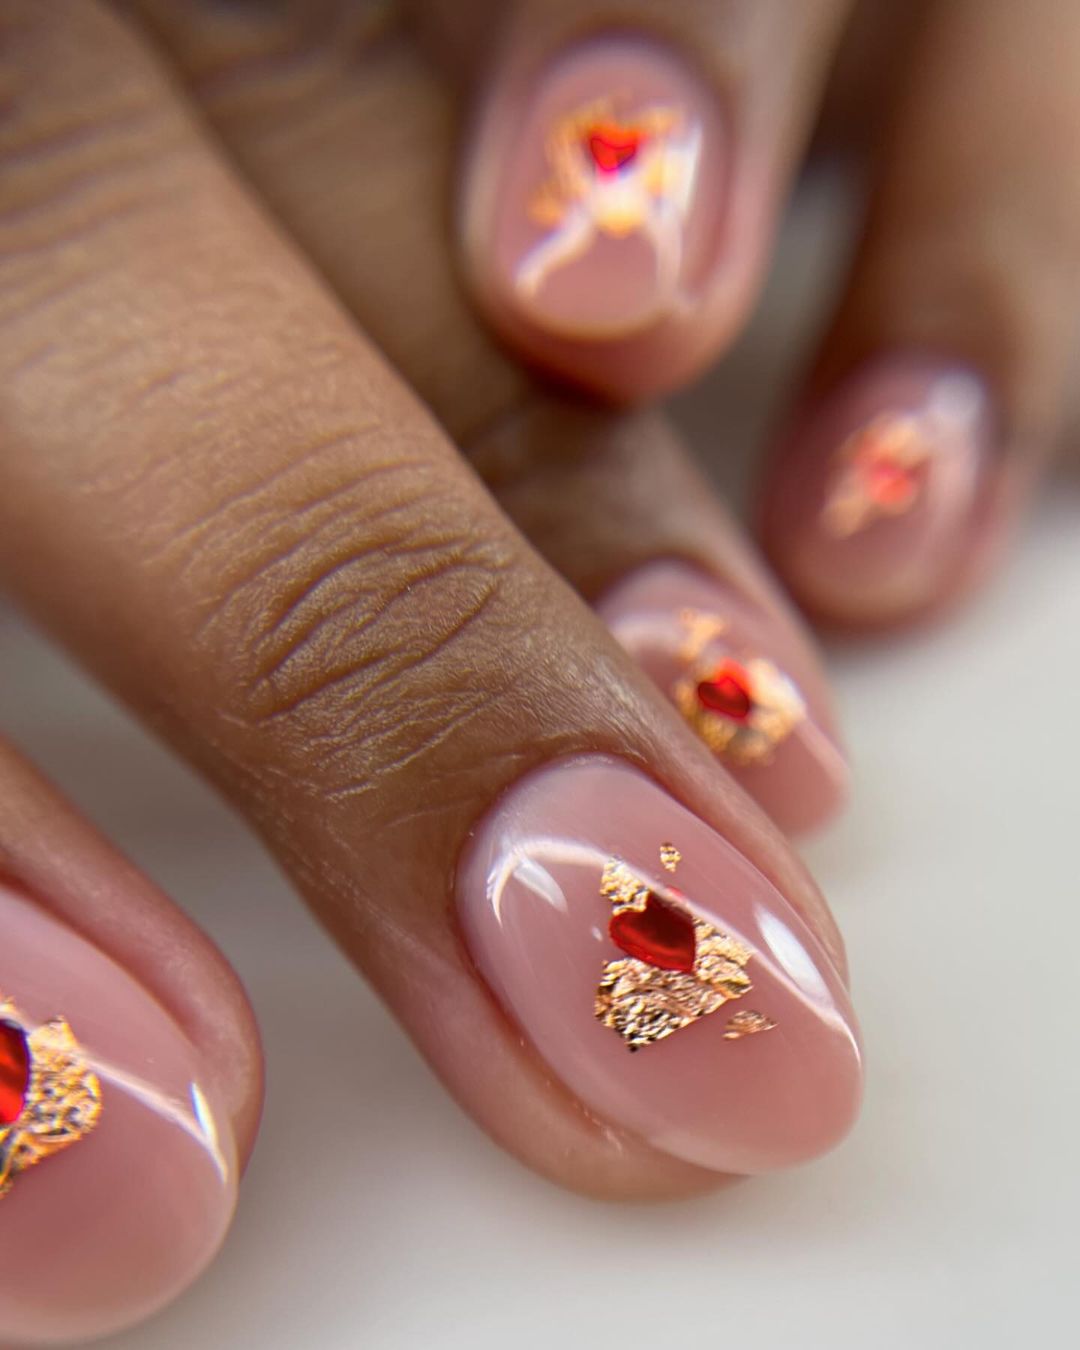
- Butter London Nail Foundation Priming Basecoat (Base Coat)
- OPI Samoan Sand (Nude Polish)
- Artisan Gilding Flakes (Rose Gold Leaf)
- Swarovski Tiny Gems (Red Rhinestones)
- CND Vinylux Weekly Top Coat (Top Coat)
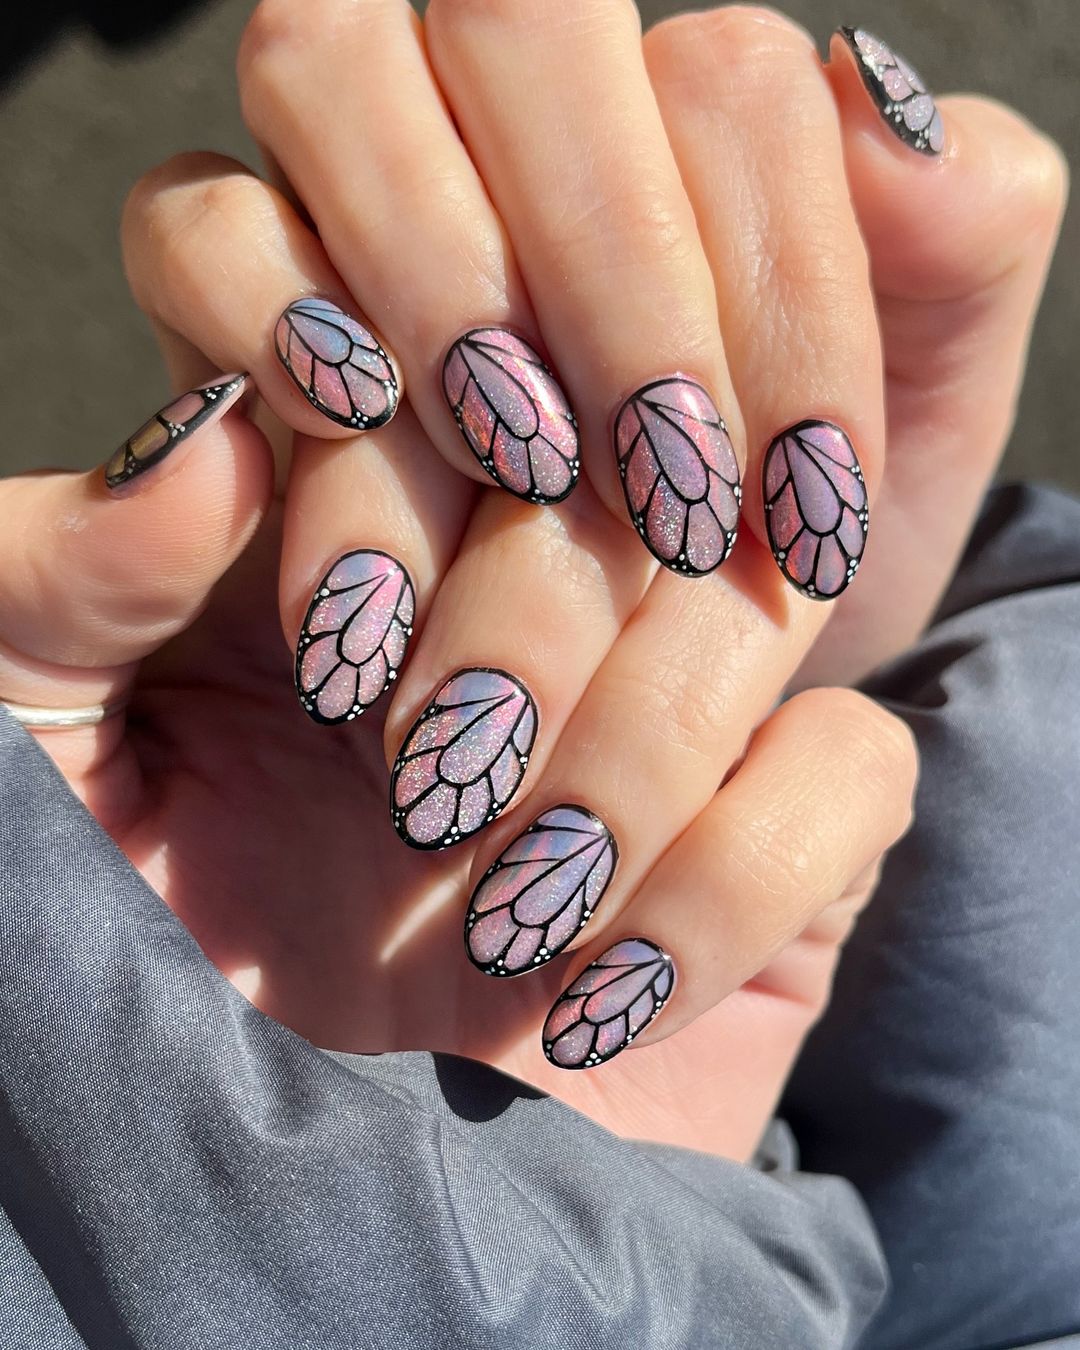
Dieses Design ist eine fröhliche Hommage an die Wildheit des Sommers. Es umfasst die Mischung aus Lila und Türkis mit einer glatten schwarzen Linie, die es umgibt, für Definition und Tiefe. Es ist eine großartige Wahl für Menschen, die gerne einzigartig und kreativ sind.
Die Farben sind lebendig und halten während der Sommersaison länger, weshalb dieses Ästhetik-Panel arrangiert wurde.
Psychedelische Wirbel
Verwenden Sie zuerst Ihren Unterlack, bevor Sie lila Lack als Hintergrund auftragen. Sobald dieser getrocknet ist, tragen Sie wirbelndes Türkis auf und umranden Sie es vorsichtig mit dem Nagelkunst-Stift. Versiegeln Sie Ihr Kunstwerk mit einem Überlack, damit es viele Tage hält.
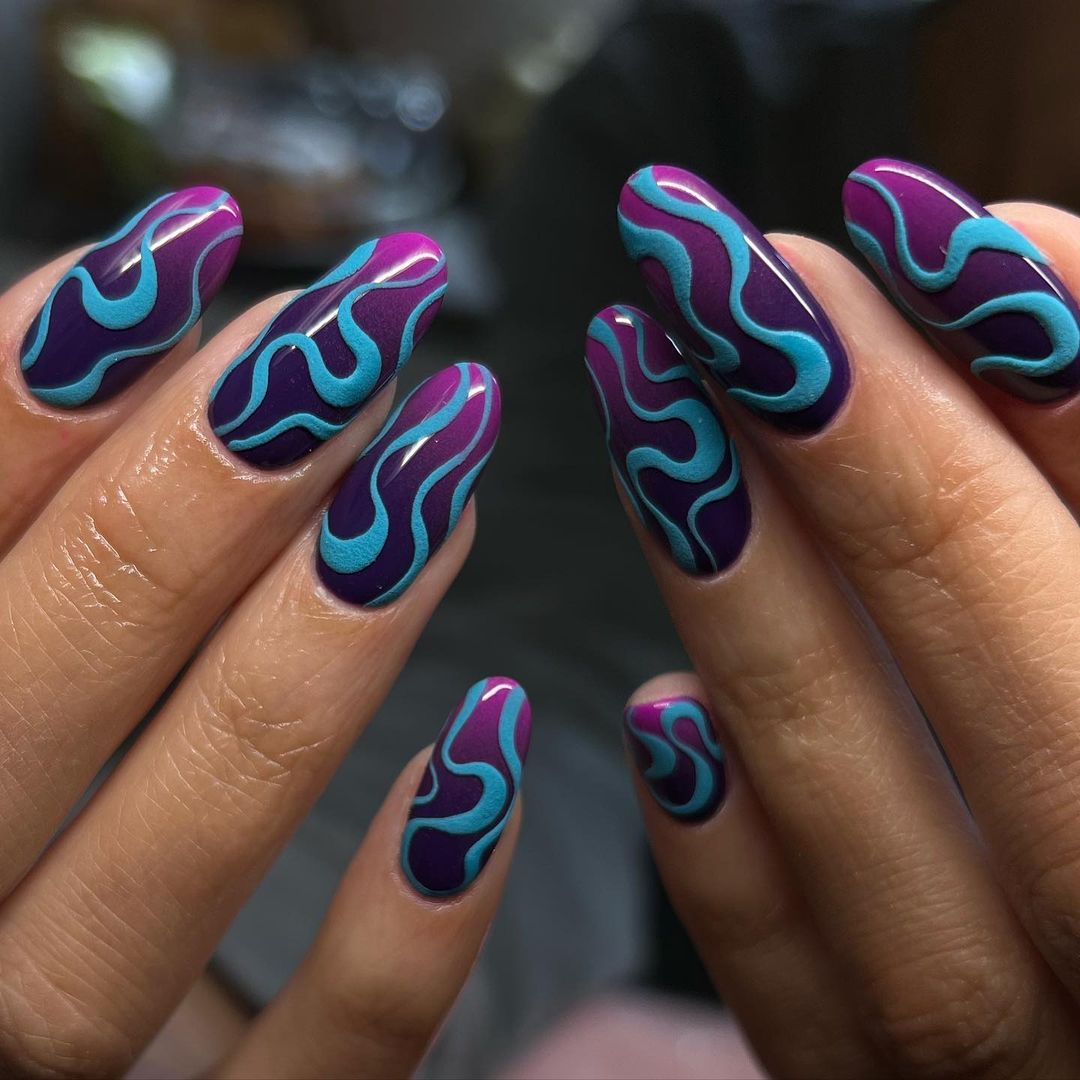
- Base Coat: ORLY Bonder Rubberized Base Coat
- Purple Polish: Zoya Charisma
- Turquoise Polish: China Glaze Too Yacht to Handle
- Black Detailing Polish: Sally Hansen Nail Art Pen in Black
- Top Coat: Glisten & Glow Top Coat
Ihre Nägel erhalten einen Retro-Touch mit der Kombination aus sanftem Lavendel und Neonorange in einem wellenförmigen Design. Diese Art von Maniküre ist ideal, um Statements abzugeben und Sommervibes auszustrahlen. Sie ist praktisch, weil sie kurz ist, aber auch verspielt durch die leuchtenden Farben.
Diese Auswahl eignet sich gut für ein glattes Auftragen und ein glänzendes Finish, das perfekt für die Sommerferien ist.
Groovy Tangerine Wellen
Tragen Sie Unterlack auf, gefolgt von einer einzigen Schicht lila Lack. Wenn der Lack getrocknet ist, verwenden Sie anderen Nagellack, um die Wellenlinien freihändig oder mit Schablonen zu zeichnen. Fügen Sie eine abschließende Schicht klaren Überlack hinzu, damit Ihre Nägel länger halten.
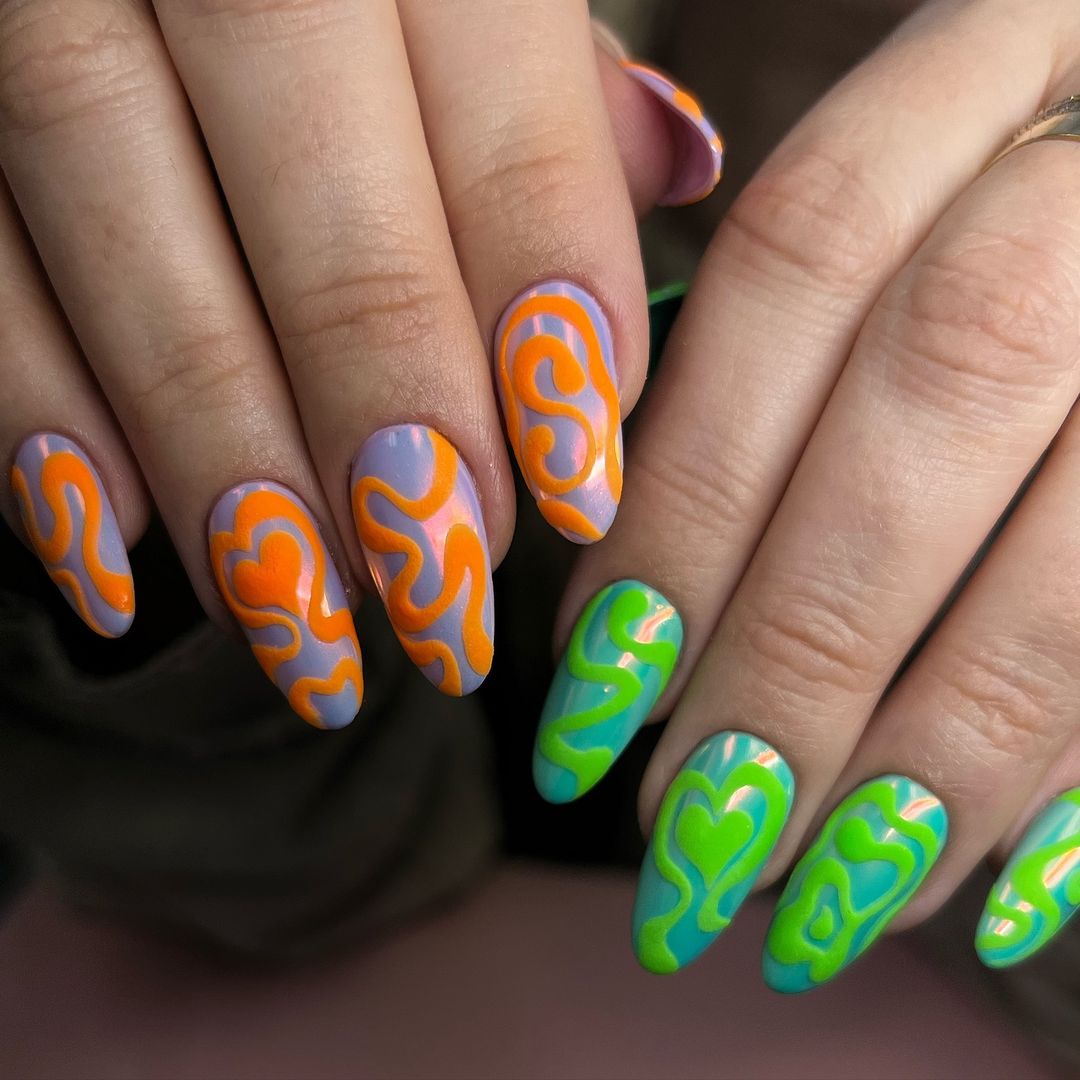
- Essie First Base Base Coat
- OPI Do You Lilac It?
- Essie’s Tangerine Tease
- Revlon Extra Life No Chip Top Coat
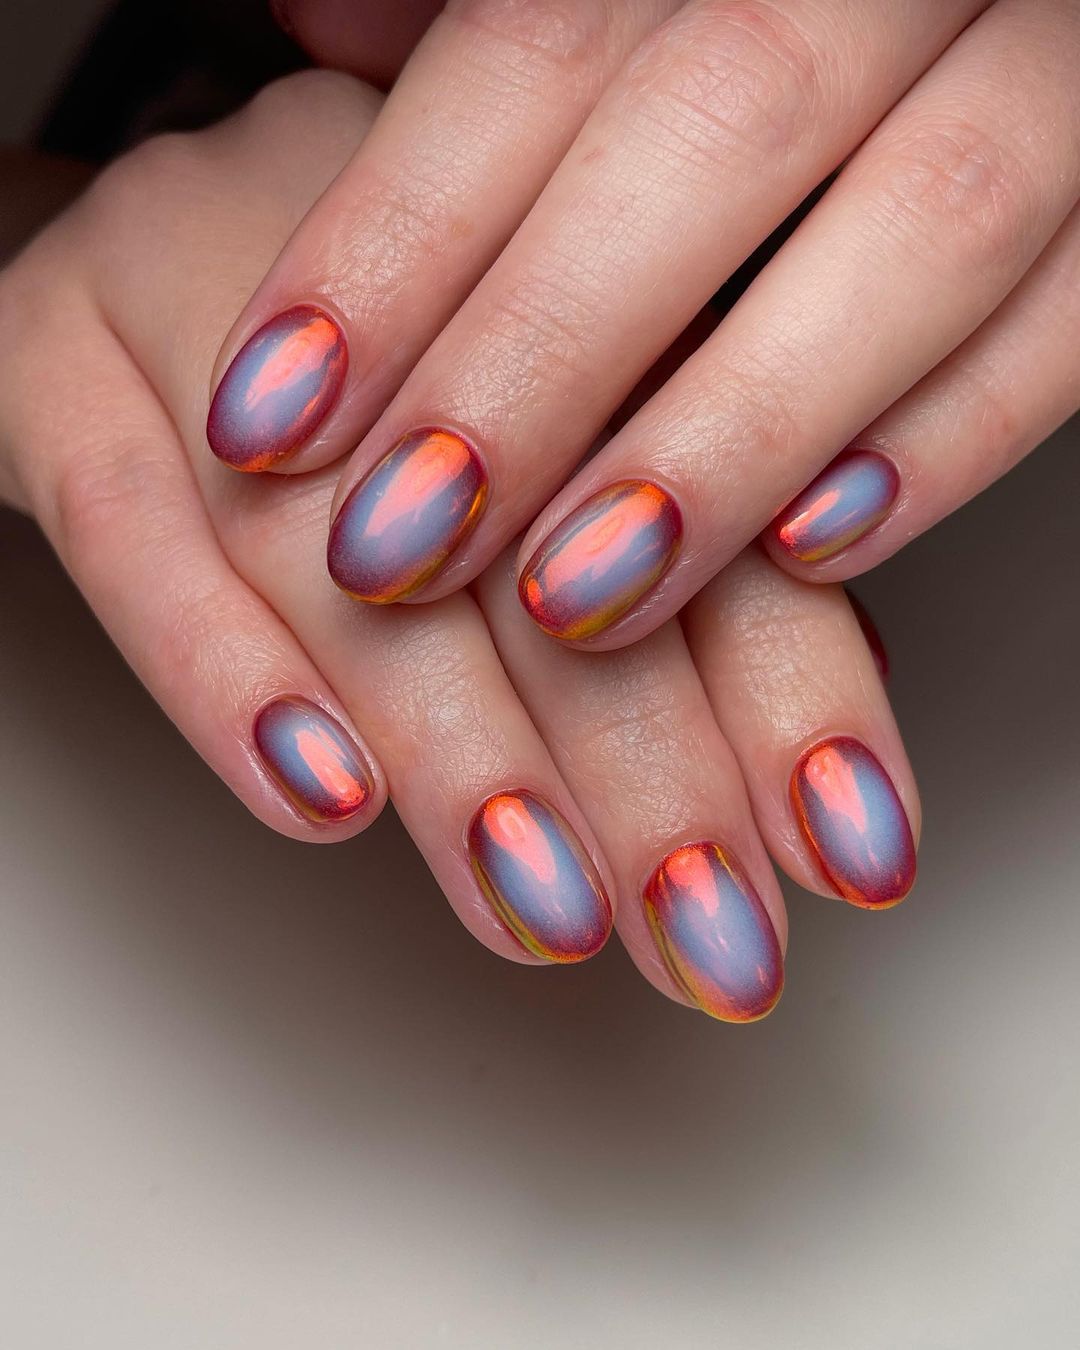
Eine beeindruckende Interpretation einer Gel-Innovation wird bei diesen Nägeln durch dieses Hartgel erreicht. Der Unterlack, der aus Silberchrom besteht, reflektiert die Sommersonne, während der 3D-Wassertropfeneffekt ein Element der Überraschung und Raffinesse hinzufügt. Es wurde mit kleinen Perlen und Sternen für einen anderen Look verziert, der perfekt für sommerliche Abendpartys ist.
Dank dieser Hightech-Kombination ist das Endergebnis ein solides Gel-Finish, das mehrdimensional ist und Aufmerksamkeit erregt, weil es funkelt, wenn Licht darauf trifft.
Chrom-Wassertropfen
Tragen Sie den Unterlack auf und anschließend Chromlack, um einen reflektierenden Hintergrund zu erzeugen. Erzeugen Sie mit 3D-Gel Tropfeneffekte auf Ihrem Nagel und platzieren Sie vorsichtig Perlen- sowie Sternaufkleber darüber, solange der Lack noch feucht ist. Härten Sie unter UV-Licht aus, bevor Sie abschließend mit einem Überlack für Haltbarkeit und Glanz versiegeln.
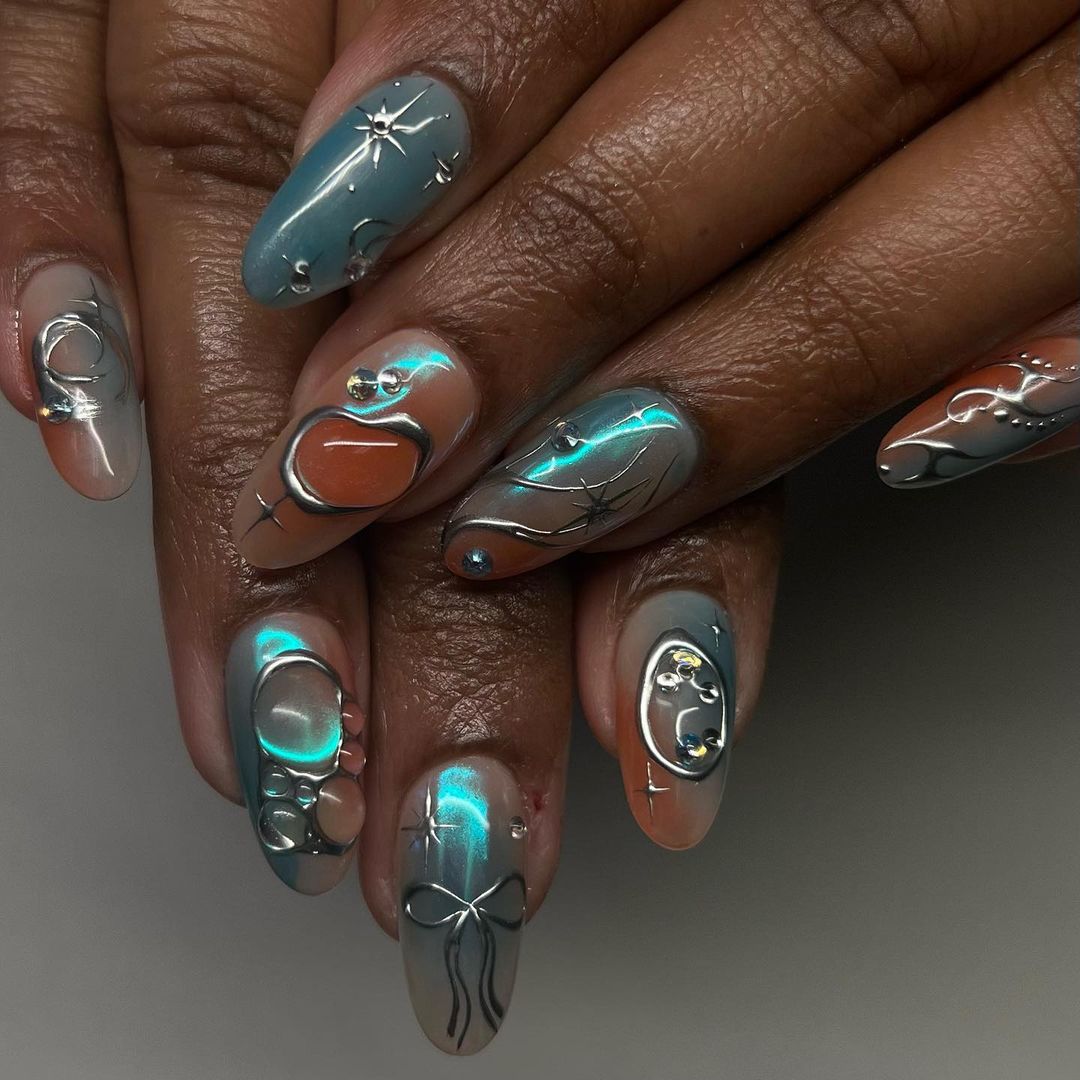
- Base Coat: Deborah Lippmann Gel Lab Pro Base Coat
- Chrome Polish: Layla Mirror Effect Nail Polish
- 3D Gel: Young Nails Synergy Gel
- Embellishments: Micro-beads and star decals
- Top Coat: INM Out The Door Super Fast Drying Top Coat
Diese Artikel wurden ausgewählt, weil sie Licht außergewöhnlich gut reflektieren und gleichzeitig ihre Farbe ändern, um Ihren Nägeln einen magischen Touch zu verleihen.
Beginnen Sie mit dem Auftragen eines Unterlacks zum Schutz Ihrer Naturnägel. Sobald dieser getrocknet ist, tragen Sie zwei Schichten des farbwechselnden Lacks auf und stellen Sie sicher, dass jede Schicht trocken ist, bevor Sie mit der nächsten beginnen. Versiegeln Sie Ihre Nägel im letzten Schritt mit einem ultra-glänzenden Überlack, der ein Bild von der Schönheit des Sommers in der Dämmerung darstellt.
Sonnenuntergangs-Aura
Mit einem verspielten Wellenmuster auf einer pinken Basis, die so klar wie der Himmel ist, schaffen sie eine hervorragende Balance zwischen Stärke und Eleganz durch Hinzufügen von Schwarz und Weiß. Es ist skurril und farbenfroh und somit perfekt für Ihr Sommeroutfit, dem Sie einen Hauch von Neon-Spaß verleihen möchten.
- 1st coat: Zoya anchor base coat
- 2nd coat: ILNP boutique nail polish in sunset aura
- 3rd coat: ILNP ultra glossy seal
Mit diesen präzise aufgetragenen Produkten bleiben Ihre Nägel den ganzen Sommer über verspielt, da sie saubere Trennungen und eine lange Haltbarkeit aufweisen.
Beginnen Sie mit dem Auftragen eines Unterlacks, damit Sie eine glatte Leinwand haben. Verwenden Sie pinken Lack für die Grundschicht. Wenn er fest ist, zeichnen Sie mit Nagelkunst-Stiften Wellenlinien darüber. Lassen Sie es vollständig trocknen und versiegeln Sie es abschließend mit einem schnell trocknenden Überlack, der ewigen Glanz verleiht.
Verspielte pinke Wellen
Diese Auswahl ermöglicht es Ihnen, ein hartes, gelartiges Finish zu erzielen, ohne eine Lampe zu verwenden, wodurch Ihre Nägel so hell und farbenfroh wie möglich und gleichzeitig stark genug sind.

- OPI Nail Base Coat
- China Glaze Polish in Shocking Pink
- Sally Hansen Nail Art Pens in Black and White for Detailing
- Seche Vite Fast Dry Top Coat
With these products applied accurately, your nails will stay playful all throughout the summer because they have neat separations and long wearing ability.
Start off with applying a base coat so that you have smooth canvas. Use hot pink polish for the base layer. When it sets, draw wavy lines on top using nail art pens. Let it dry completely and then finish it by covering with fast drying top coat which gives shine that lasts forever.
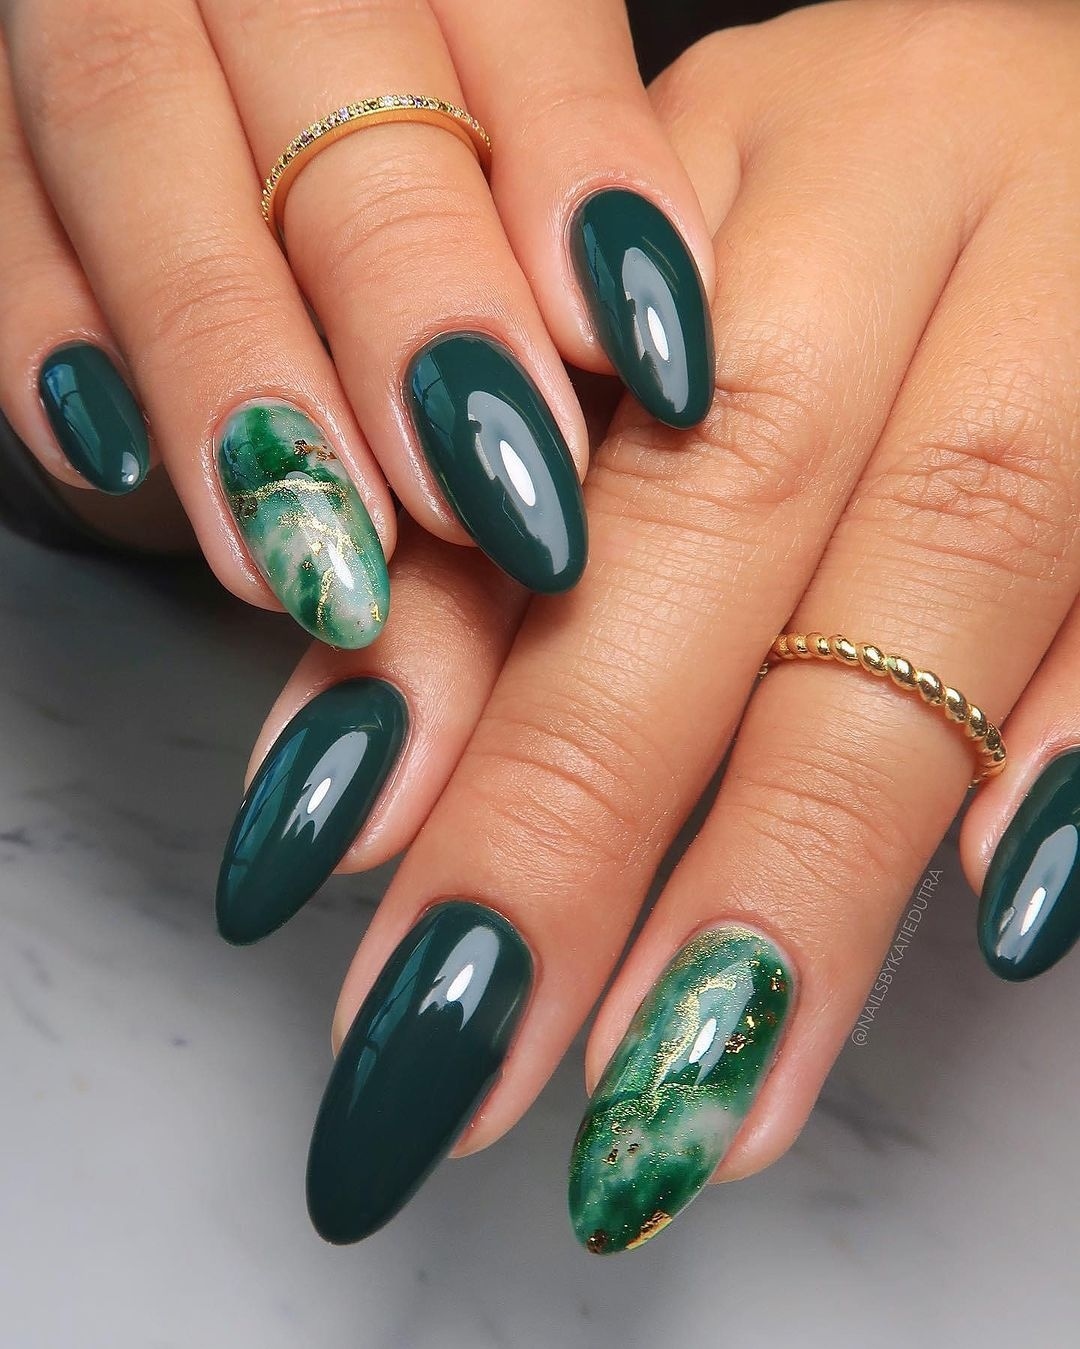
Verzauberndes Smaragdgrün
The beautiful dark green polish paired with marbling on it, creates a special and attractive appearance. In addition, gold leaf flakes are scattered over this design to add some luxury and evoke the buried treasures of the sea.
- CND Stickey Base Coat – base coating
- Essie Off Tropic – dark-green-polishing
- Elite99 Color Gel – gel for marbling
- Gold Leaf Gilding Flakes – gold leaf flakes
- OPI GelColor Top Coat – top coat.
This selection will enable you to achieve a hard gel-like finish without using a lamp thus making your nails as bright and colourful as they are strong enough.
On first, apply the base coat on your nails before painting them dark green for that mysterious background. Secondly, create patches of marble by dabbing it in places then use toothpick to mix the paint colors together. Before drying completely, this should be complete while still sticky so that gold leaf flakes can be sprinkled all over it. Lastly, put on a top coat which will lock the mesmerizing oceanic effect inside.
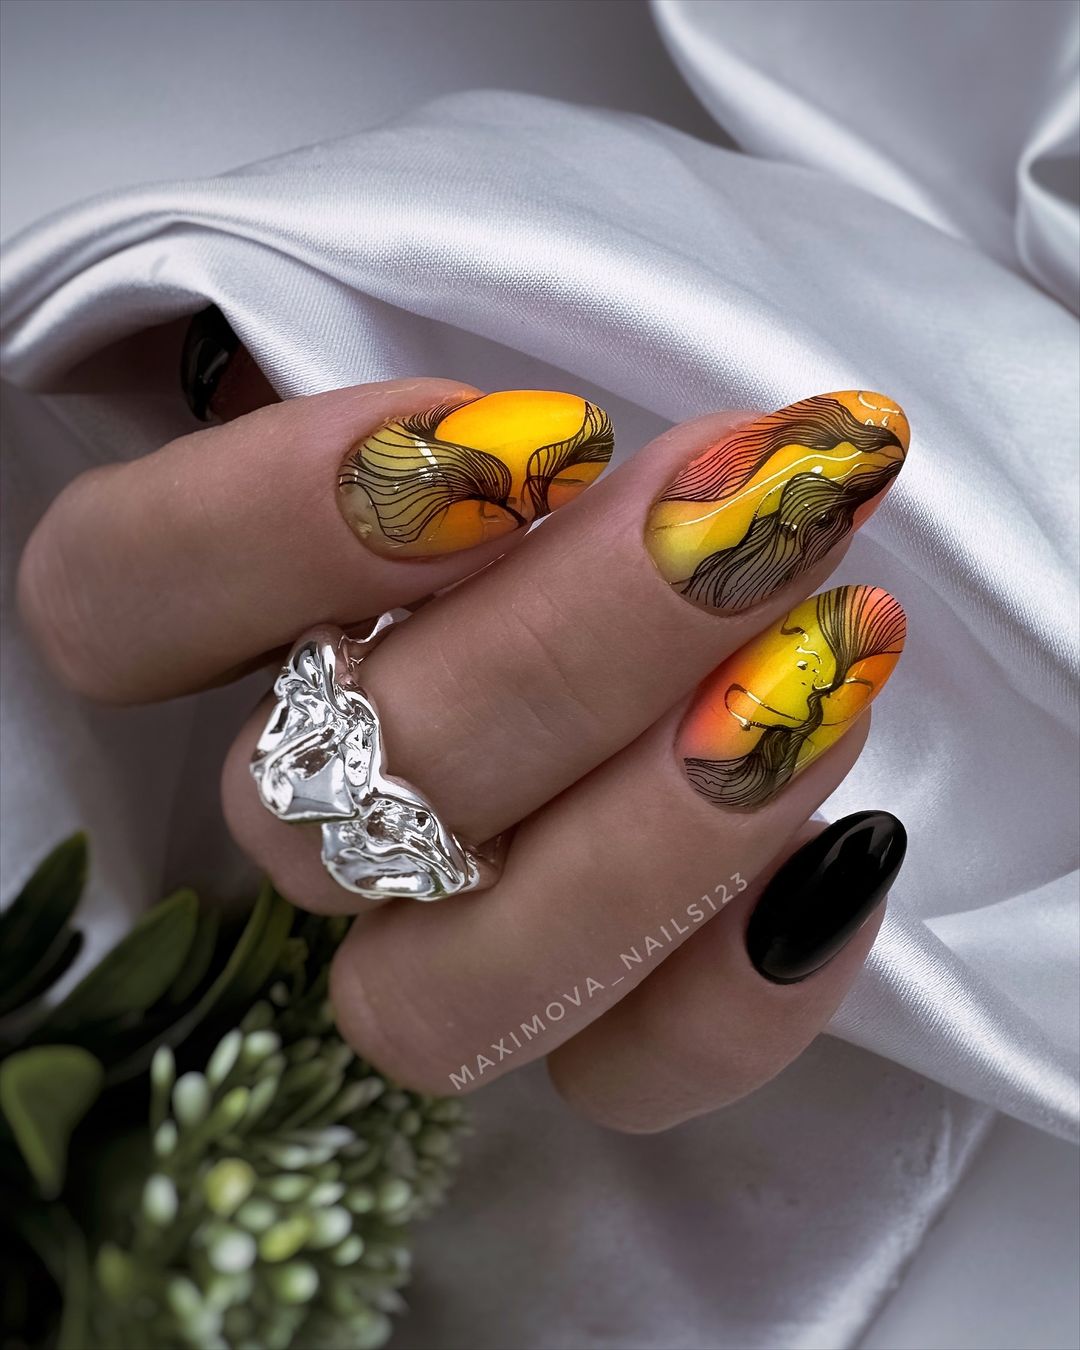
Golden Sunset Lines
This design is true artistic expression, conveyed through swishing curves and bright colors that imitate the evening sky painted with sunset colouring. The solid black nails provide a striking contrast making golden and orange highlights pop with a twist.
- ORLY Bonder Rubberized Base Coat: Base Coat
- OPI Black Onyx: Black Polish
- Playing Koi and Hay There by Essie: Orange and Yellow Polishes
- Gold Nail Art Pen by Sally Hansen : Gold Detailing
- Seche Vite Dry Fast Top Coat: Top Coat
They are selected for high pigmentation levels required for delicate designs.
Apply the base coat first, then alternate between painting your nails black and drawing the sunset picture. Blend orange and yellow polishes on a sponge as you dab them on your nail for the design. After drying, apply fine lines using gold nail art pen. Shine over everything using a top coat to make it last long.
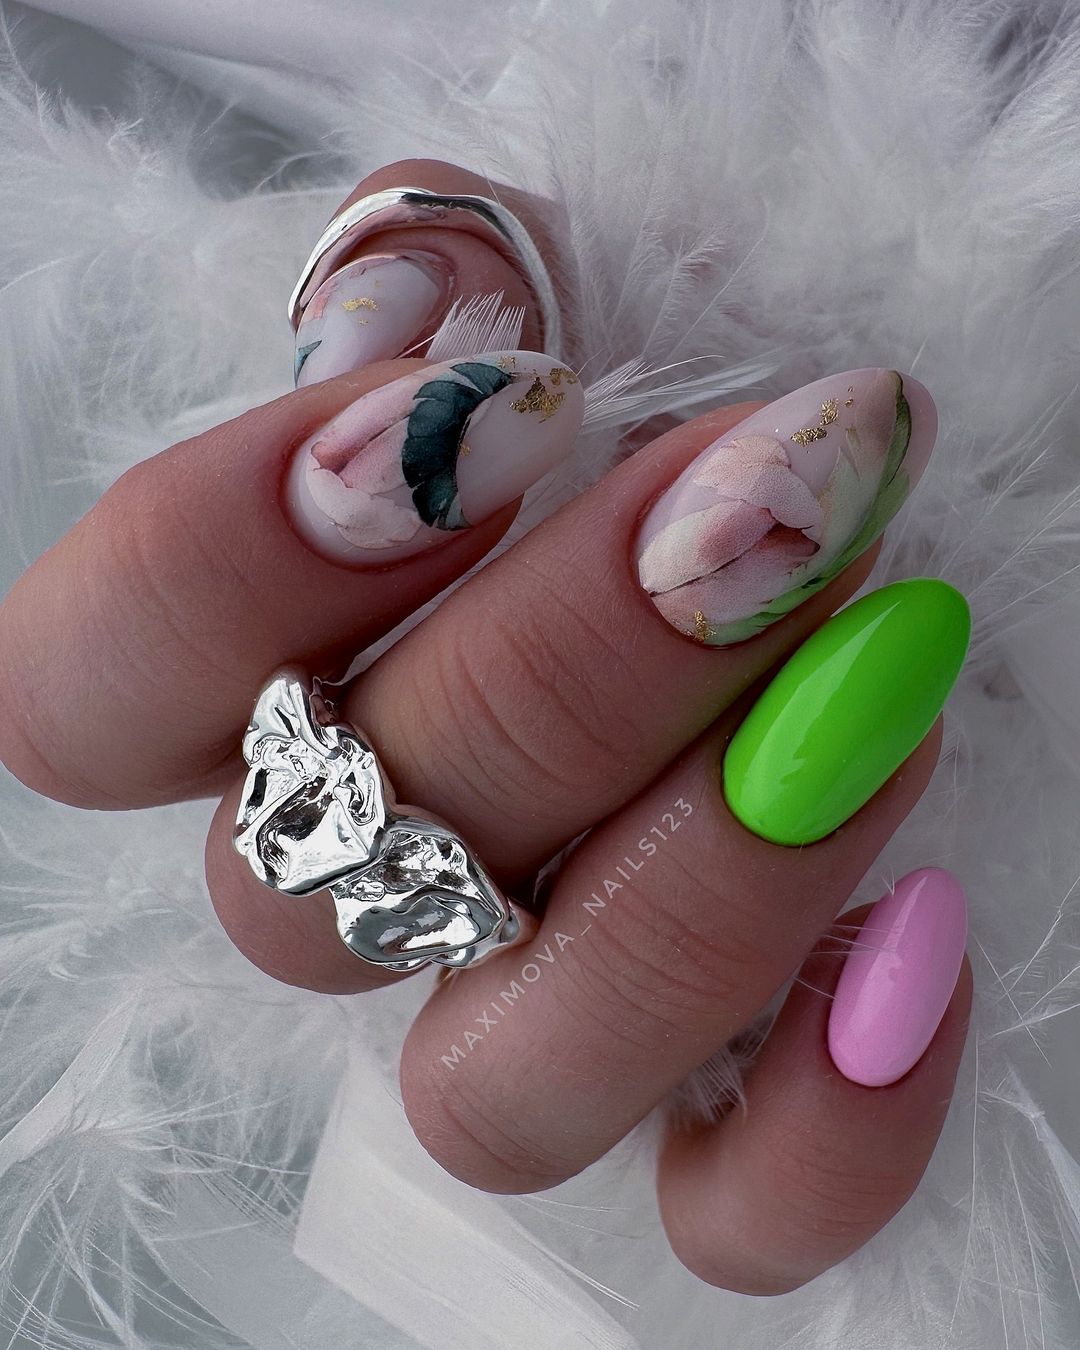
Feathered Elegance
Neutral with soft white feather designs and bold statements of colour, this nail design is accented by small gold flecks. This is a simple way that speaks sophistication while still maintaining a touch of playfulness.
- Base coat: Smith & Cult Basis of Everything Base Coat
- White polish for feathers: China Glaze White on White
- Gold leaf flakes: Nail Artisan Gold Leaf Flakes
- Color polishes: Various shades for accents
- Topcoat – Butter London Hardwear Shine UV Topcoat
These products bring out the subtleties and intricacies in a gentle yet powerful nail design.
Prepare your nails with base coat. Apply neutral polish as a base color then carefully paint feather patterns on top. For extra opulence, add some colors and gold leaf flakes to accentuate the look. Smooth, long-lasting manicure can be achieved by applying top coat at the end.
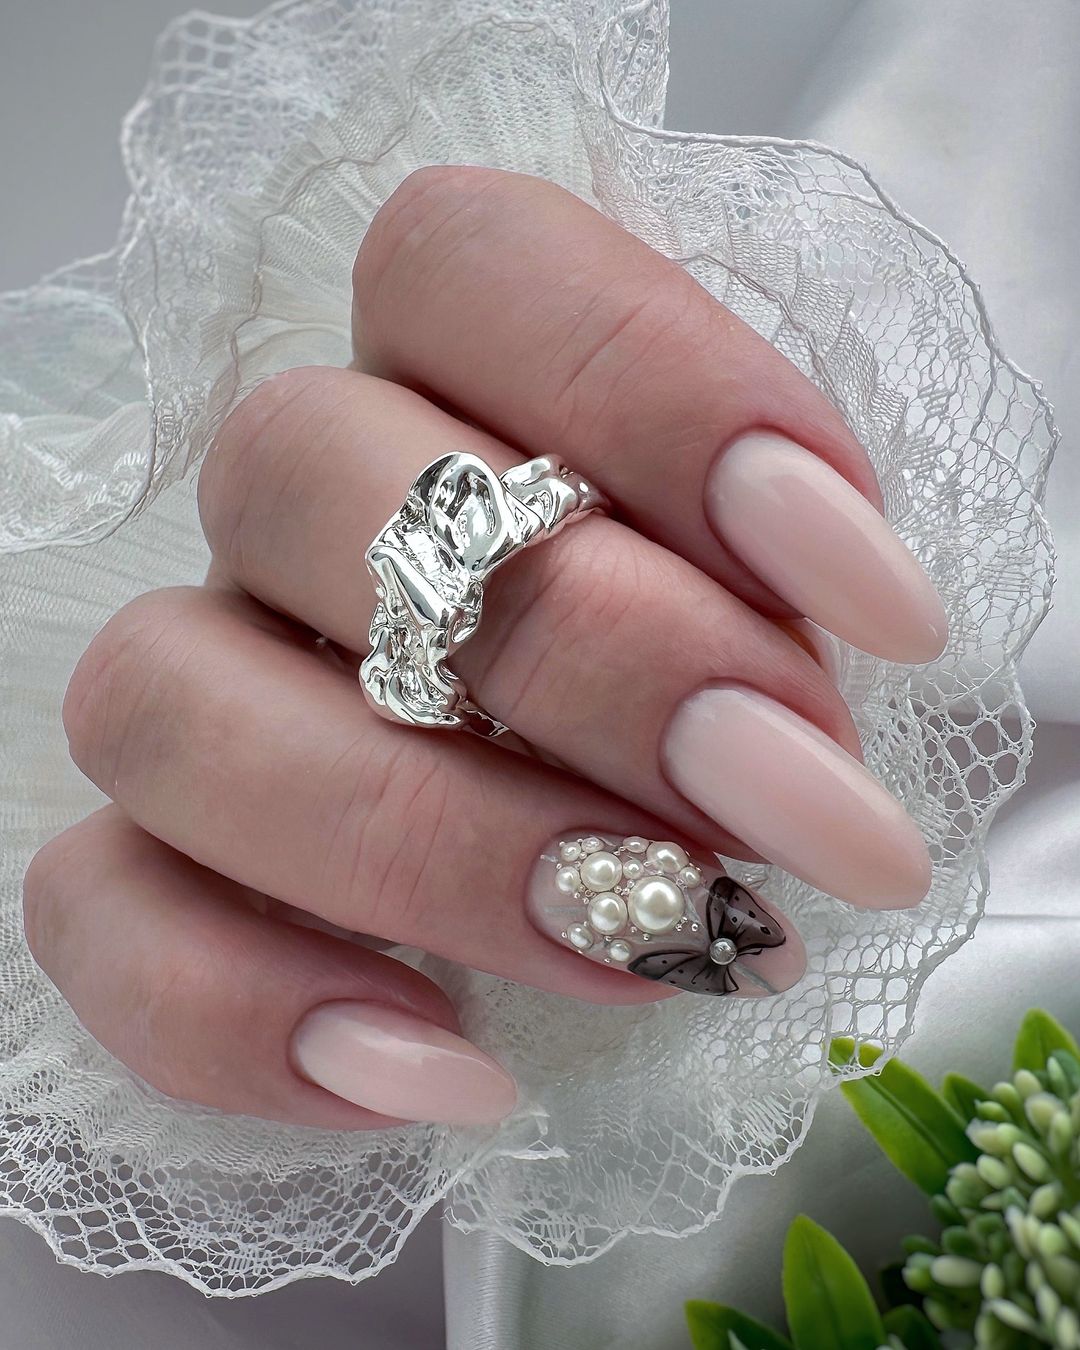
Pearlescent Lace
This design has a solid gel look with a soft pastel color that is adorned with lace-like details and beaded embellishments. It speaks to a timeless elegance, but there is an infusion of modernity through the use of metal accents.
- Base Coat: CND Shellac Base Coat
- Pastel Polish: Essie’s Muchi, Muchi
- Lace Stickers: Elegant Touch House of Holland Nails
- Pearl Embellishments: Swarovski Crystal Pearls
- Top Coat: CND Shellac Top Coat
These materials were selected because they add class to your nails without compromising on their resilience.
Start by applying the base coat followed by two layers of any preferred pastel polish. After it dries, place lace stickers and put pearl embossments carefully on accent nails. Finally, secure all these elements using a top coat for a shiny finish that will protect as well as last long.
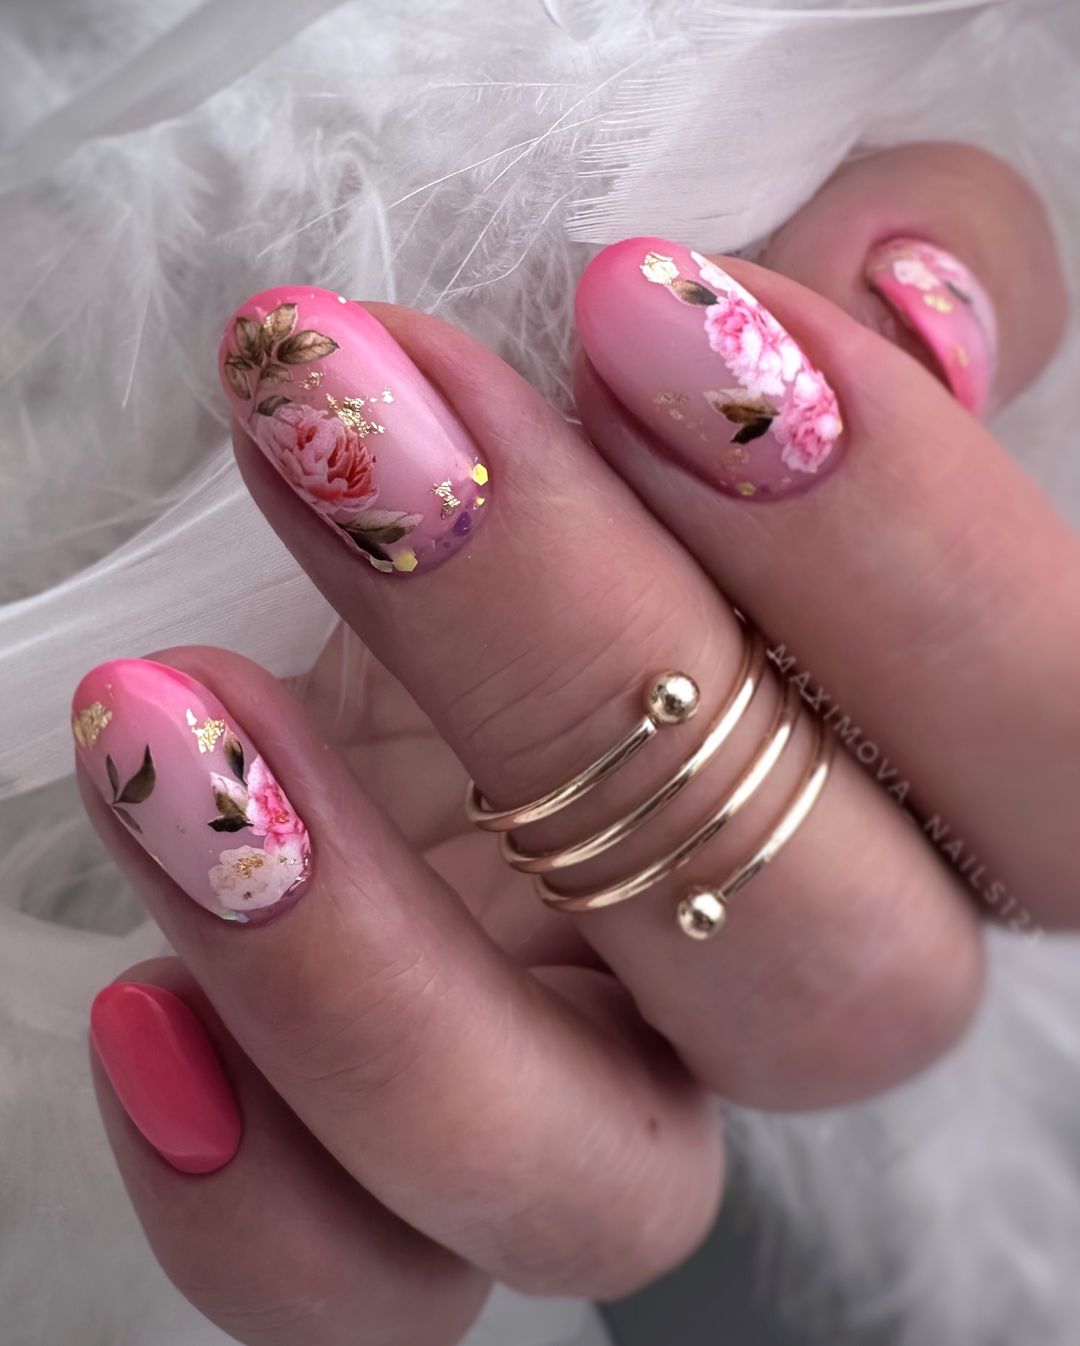
Floral Fantasy
This design blends a bright pink base with delicate floral prints, bringing some of the beauty of nature to your fingertips. It’s a rich summer party that would be incomplete without golden decorations. Every nail is artistically done in its own way.
- OPI Natural Nail Base Coat: Undercoat
- Essie’s “Fiesta”: Pink Polish
- Floral Stickers or Hand-Painted Using Acrylic Paints
- Imitation Gold Leaf Sheets: Gold Leaf
- Seche Vite Dry Fast Top Coat: Overcoat
These selections mean to have textures and three-dimensionality for a long-lasting, feel good floral arrangement.
First apply the natural nail base coat and then the bright pink polish. For individuality try using floral stickers or hand painted flowers. The gold leaf should be applied as small patches for a luxurious effect. To protect it well and make the design look better finish with a top coat.
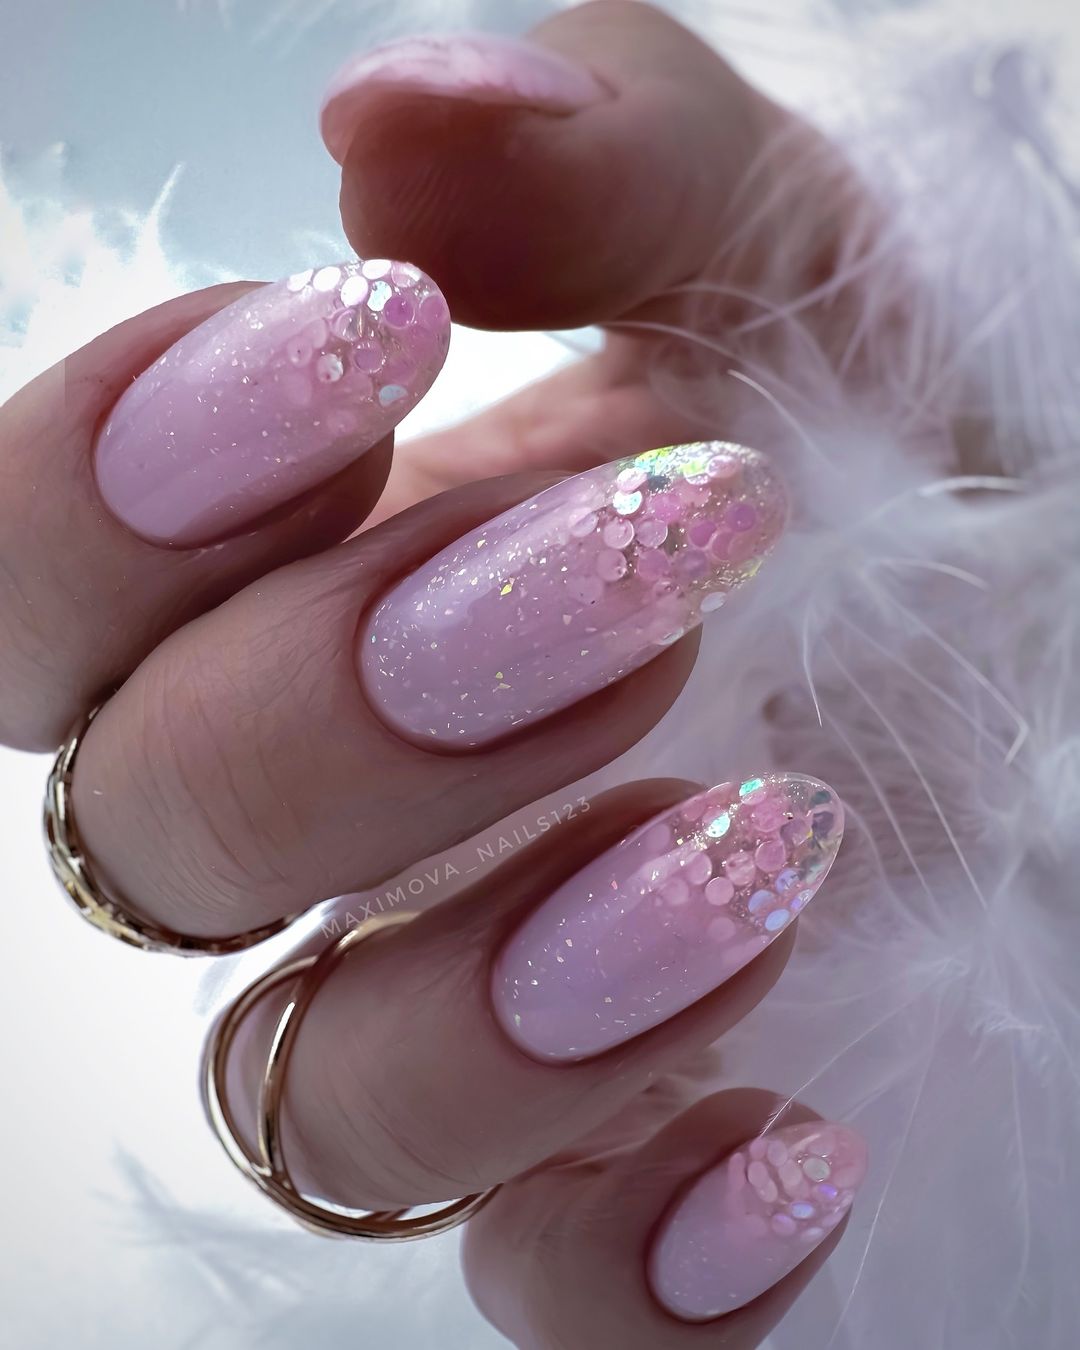
Glittering Pink Sequins
Those who shine can have a manicure like this. A base coat in pastel shade is made to stand out with beads of various sizes scattered all over it, creating a mix of elegance and fun. This creates the ultimate playful but sophisticated look that catches light and the eyes of everyone.
- Base Coat: Deborah Lippmann All About That Base
- Pastel Pink Gel Polish: Gelish Pink Smoothie
- Sequins: Mixed Sizes Pink Sequins
- Top Coat: INM Out the Door Top Coat
This combination makes sure your nails look like gel and will last for long with glitters.
Apply the gel polish after applying the base coat then cure under a lamp. Apply sequins before adding top coat for desired glitter effect. After curing, one more time you need to seal sequins on top for dazzling finish.
Geometric Dream
A blue base of vibrant color overlaid with varied geometric patterns in contrasting colors- this is a nail design for the audacious and the fashion-forward. It combines colorfulness and modern art, perfect for style setters and trend lovers.

- Base Coat: CND Stickey Base Coat
- Blue Polish: Sally Hansen Insta-Dri in Set Sail
- Detailing with Acrylic Paints or Nail Art Pens in Various Colors
- Top Coat: Essie Good To Go Top Coat
These products’ composition assists to make precise designs are long-lasting.
Start with a base coat to prepare the nail. Apply your blue polish as such backdrop. With acrylic paints or nail art pens, carefully draw geometrical designs. Once dry, apply the top coat for added shine and protection on your geometric masterpiece.
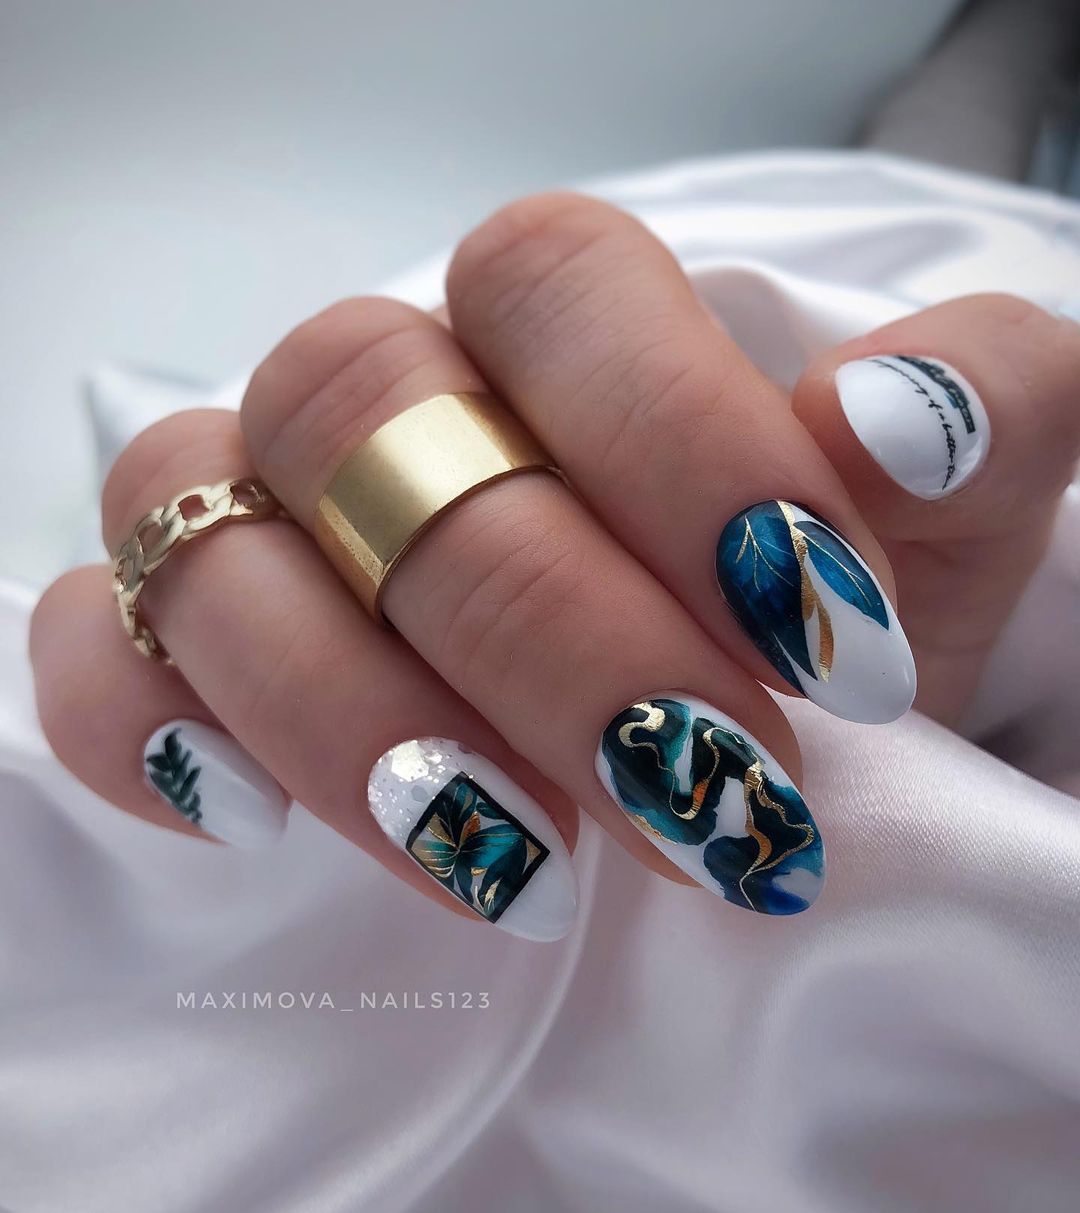
Opulent Oceanic Flair
The design is a sophisticated one that uses hard gel marbling in deep blue and teal with bold white and gold leaf accents. Contrastingly, the black solid color on the design together with the use of negative space adds drama to it thus suits those who would like to make a unique and elegant statement regarding their summer nail art.
- Base Coat: OPI Natural Nail Base Coat
- Black Gel Polish: Gelish Black Shadow
- Blue and Teal Gel Polish for Marbling: Gelish Caution and Gelish Mermaid
- Gold Leaf: Imitation Gold Leaf Sheets
- White Nail Art Pen: Sally Hansen Nail Art Pen in White
- Top Coat: CND Shellac Top Coat
These particular products are purposely selected because of their quality characteristics associated with solid looking gel and also for being highly detailed.
Start by applying the base coat, then paint some nails black using the gel polish, curing them under a lamp. Where there is marble effect, mix blue and teal shades on a palette before swirling them together on your nail using a fine brush; after that, cure. Add some gold leaf accents as well as using the white nail art pen to highlight some details in them. Finally, seal this off with a top coat to give it an astonishing shiny finish.
Sage Serenity
This report focuses on sage and mint green gels blended together to achieve an elegant, uncomplicated yet sophisticated look. Additionally, the inclusion of 3D gel droplets pays tribute to a lively summer while the different shades reflect the multi-dimensional colors of a luxurious summer.
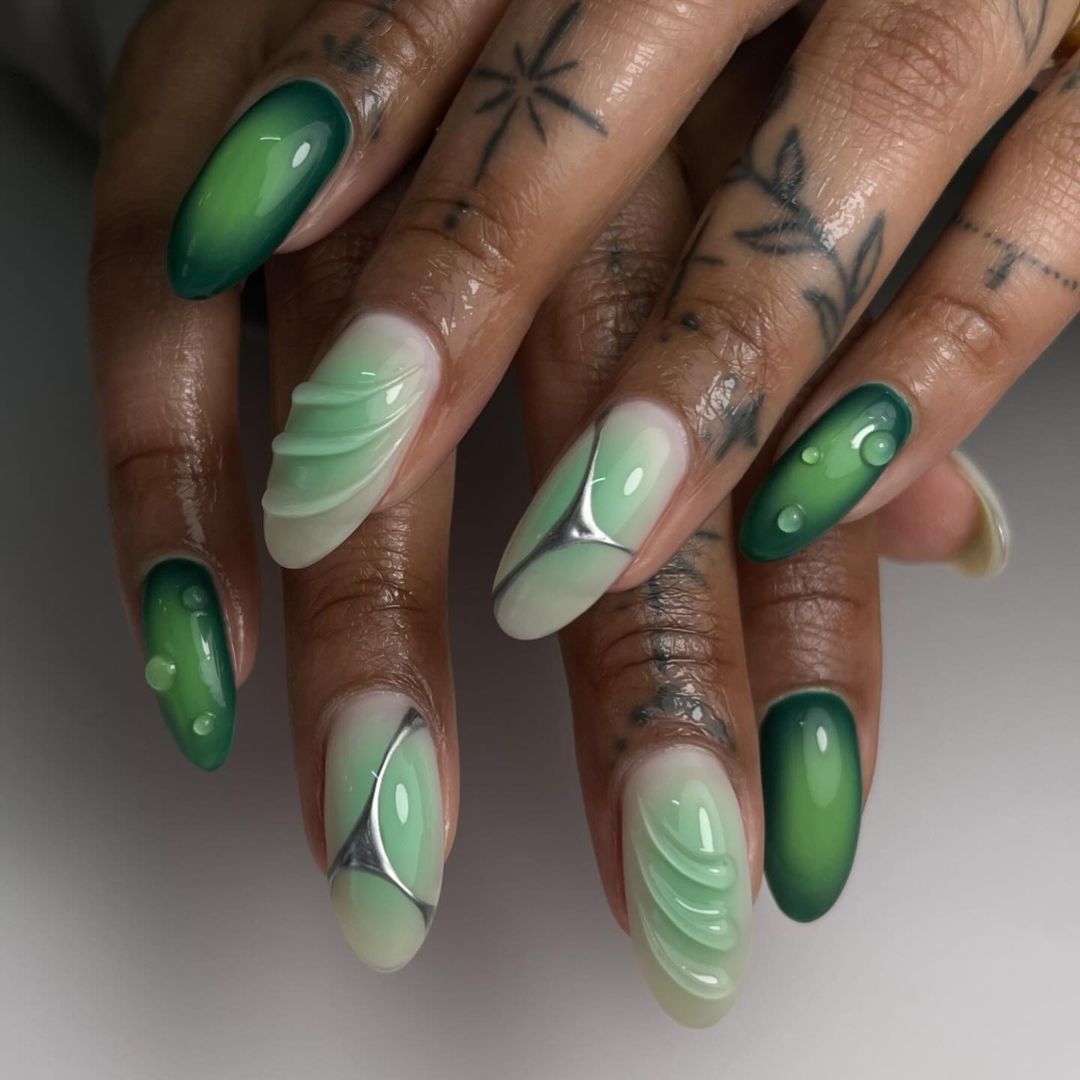
- Essie Here to Stay Base Coat
- OPI Stay Off the Lawn: Sage Green Gel Polish!
- OPI That’s Hula-rious!: Mint Green Gel Polish!
- Young Nails Synergy Gel: 3D Gel for Droplets!
- OPI GelColor Top Coat: Top Coat!
These gels and top coat were chosen because they could add depth and texture to make your design long-lasting and eye-catching.
Soft gradient using sage and mint green gels with base coat applied. Cure under lamp after adding an interesting textural element like 3D gel droplets. To keep your nails inspired by nature looking tranquil top coat it over.
Geometric Pearls and Metals
Combining softness of neutral shades with hard contrast of geometric shapes and metal studs is the objective of this design. The touch of Pearlescent white hints at luxury and beauty while golden decorations add an exciting colorful sophisticated look.
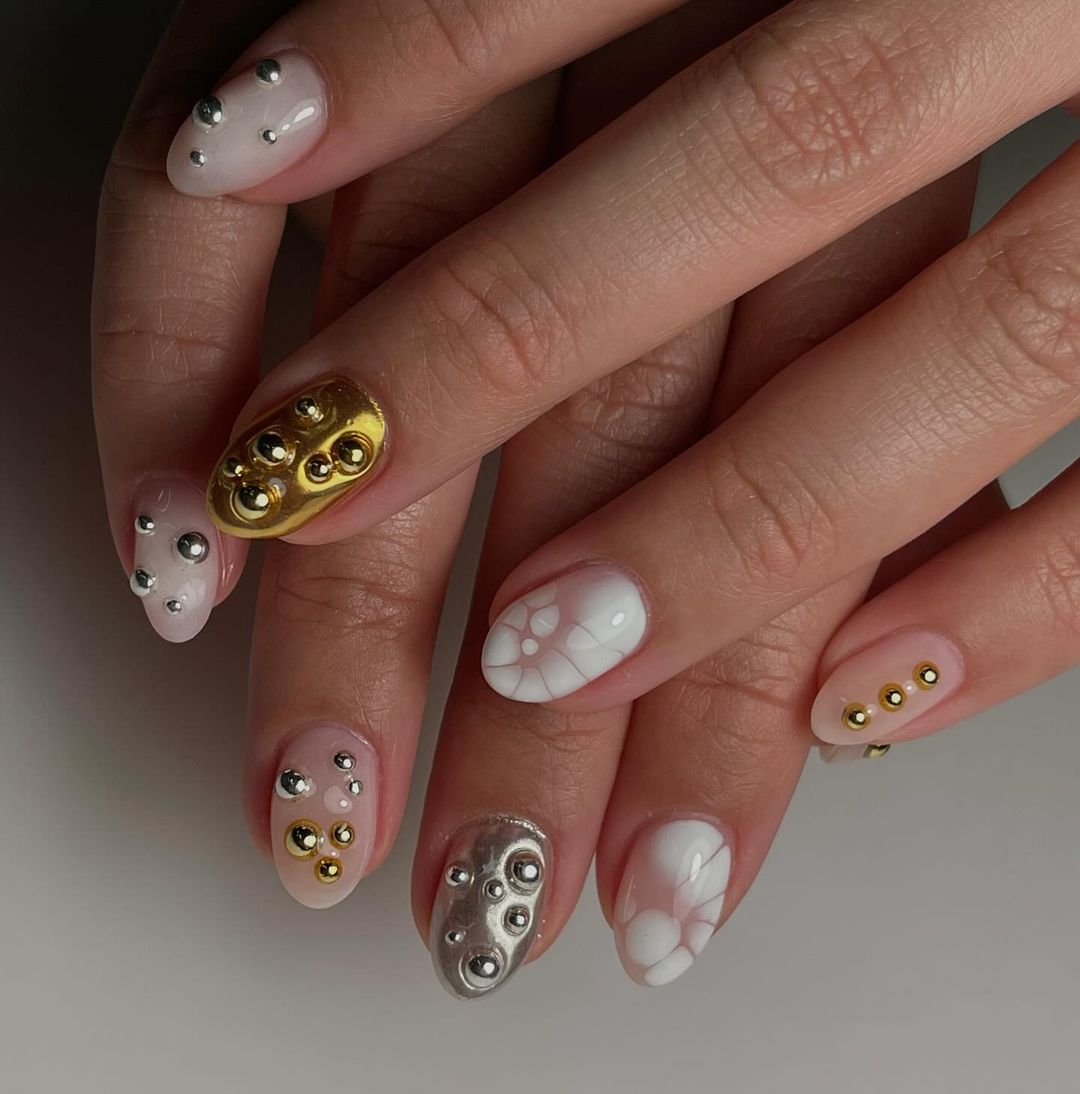
- Base Coat: Deborah Lippmann All About That Base.
- Neutral Gel Polish: Bio Seaweed Gel in Creme.
- White Nail Art Paint: Acrylic or Gel Paints.
- Metallic Studs: Gold and Silver Studs for Nail Arts.
- Top Coat: Deborah Lippmann Gel Lab Pro Top Coat.
The selection of these products was based on their high quality that serves as a good foundation for decorating and makes them durable.
First, apply a base coat to protect the nails. Then put on the neutral gel polish in cream as your initial layer then make use of white paint for geometrical drawings. While your design is still wet, press into it the metallic studs. Give your nails a lasting effect by applying a top coat to finish off this elegant look.
Metallic Flow
The shining silver polish has a reflective nature in this design that is so striking with a bold, modern, mirror-like finish that is glamorous. This is the idea of motion conveyed by the whirling, almost liquid pattern of the varnish and therefore makes it an ideal choice for those who wish to stand out.

- Base coat: Essie Strong Start Base Coat
- Silver Metallic Polish: OPI Push and Shove
- Black Detailing Gel: Sally Hansen Salon Gel Polish in Black Tie
- Top Coat: Seche Vite Dry Fast Top Coat
This combination delivers a high-gloss, durable finish which simulates molten metal.
Apply the base coat evenly all over your nail surface. Then, while the silver polish is wet, use black detailing gel to create swirls. Use thin brush to mix black color into silver then seal it with any topcoat for durability and shine.
Color Droplet Contour
The design is perfect for those warm summer days when you are in a relaxed mood. The clear gel base has been applied with bright, colorful droplets of various shades that give it a cool and playful look. This simple but efficient way adds color to your everyday style.

- Base Coat: OPI GelColor Base Coat
- Clear Gel: Bio Seaweed Gel – No-Wipe Top Coat
- Colored Gels: Assortment of gels for the droplets
- Top Coat: OPI GelColor Top Coat
The clear gel base acts as a canvas for the vibrant colored gels, which are chosen based on their pigmentation and staying power.
Start by applying the base coat. Apply the clear gel then drop the colored gels onto the nails in droplet patterns. Then cure under lamp and apply top coat to achieve glossy finishes and protect designs.
Abstract Floral Mosaic
An abstract feel reminiscent of a modern art piece is created by the pastel base with free-form shapes and floral accents. The vivid colours against a soft backdrop make this design suitable for those who want to approach nail art from a more artistic and individual angle.
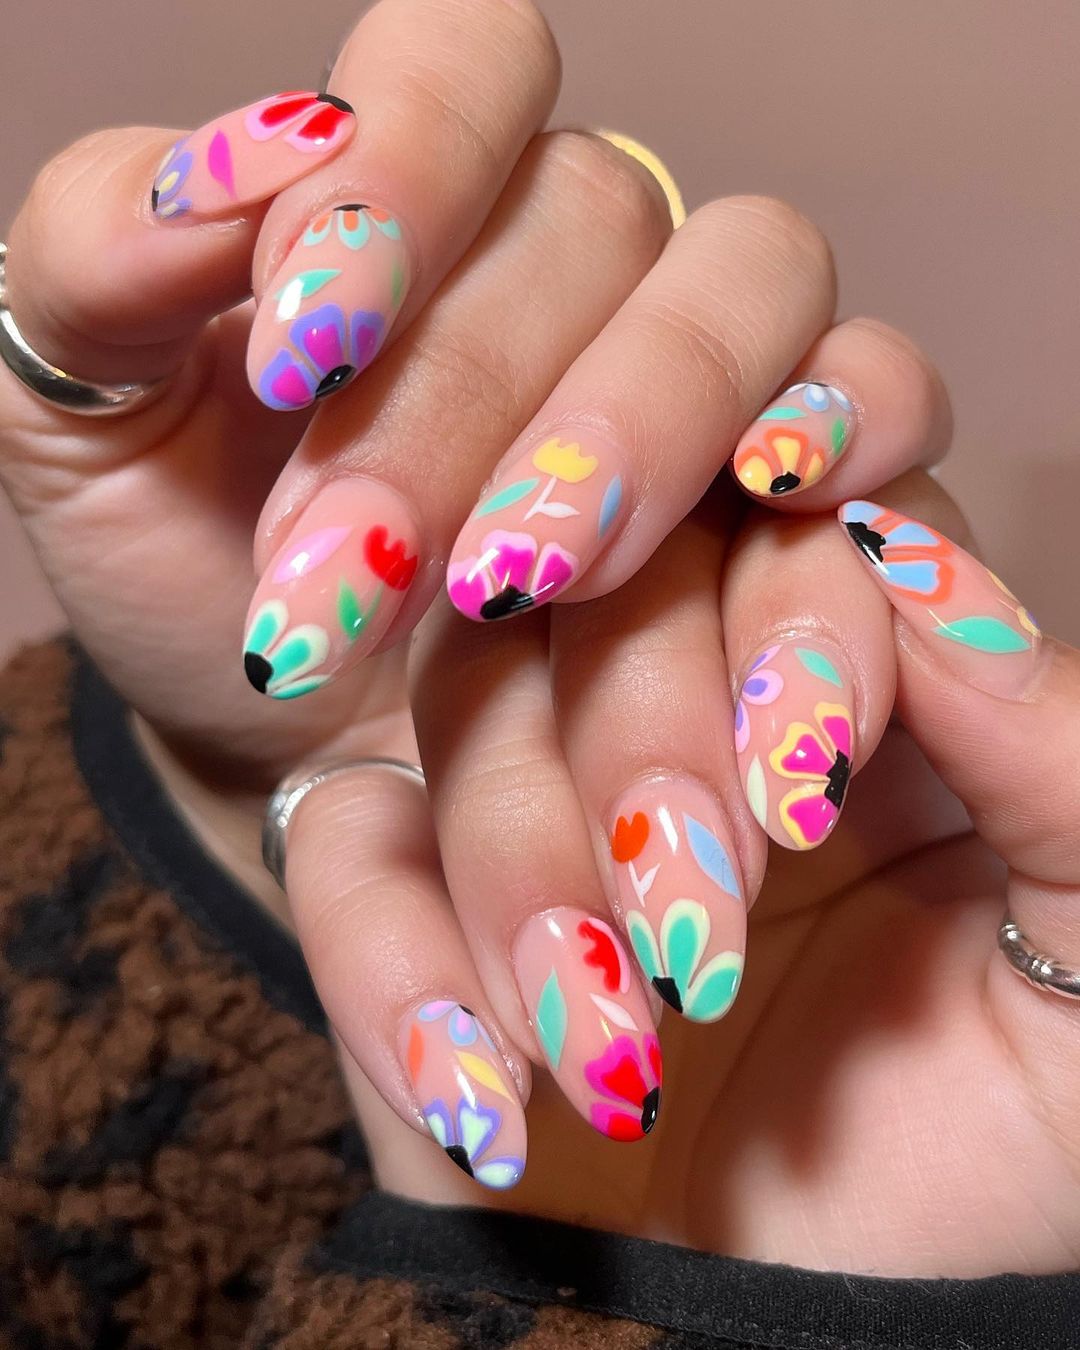
- Sally Hansen Miracle Gel Base Coat: Base
- Pastel Polishes: Various shades for the background as well as floral accents
- Black Nail Art Pen: Shape definition and outlines
- Sally Hansen Miracle Gel Top Coat: Top coat
The nail polish provides a muted background to these bright flower accents, while the black nail pen is used to make those variable forms come alive.
Put on light pastel polish after applying base coat. Make various abstract floral shapes with multiple brighter hues. For clear lines, define edges with black nail art pen and then apply top coat over your drawing in order to seal it in place and give it some shine.
Yin Yang Harmony
These Nails Celebrate the Simplicity and Elegance of a Neutrally Coloured Palette, Enhanced with a Tiny but Influential Yin Yang Symbol. It is quite simple yet elegant design that contains some depth to it, this design can be appropriate for those who like being unique in their personal philosophy.
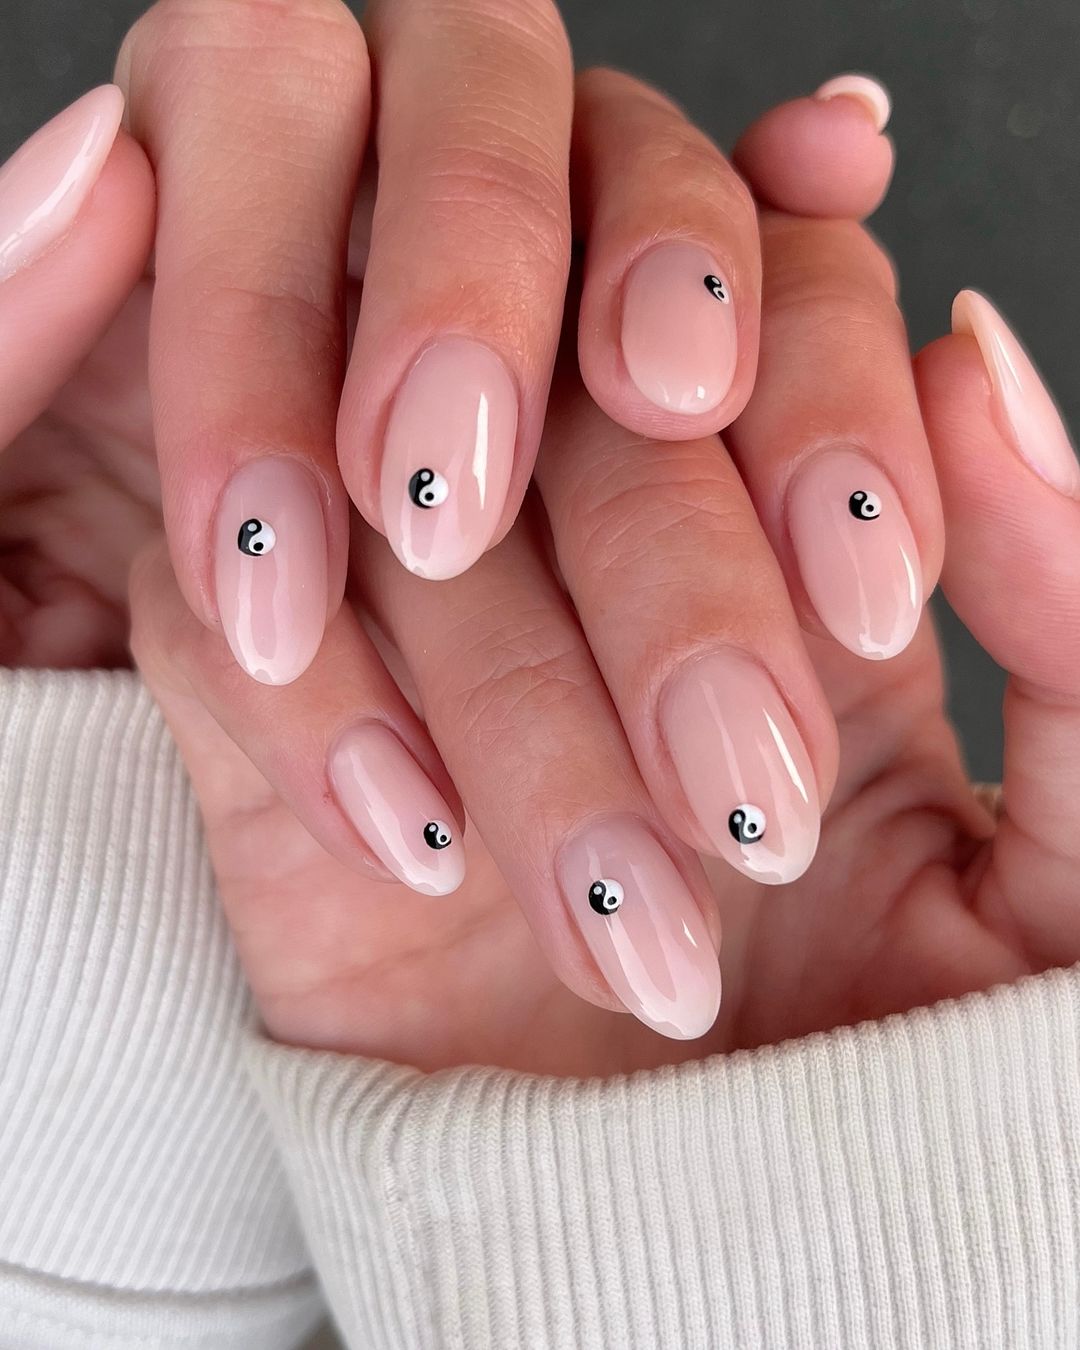
- Base Coat: Chanel La Base
- Neutral Polish: OPI Bubble Bath
- Black and White Polish for Yin Yang Detail: Essie Licorice and Blanc
- Dotting Tool: For precise yin yang symbols
- Top Coat: Essie Gel.Setter Top Coat
This Collection is Geared towards Delivering Pure, Boldness with a Minute yet Firm Element that Lasts all through the Days of Summer.
Start by applying the base coat then follow up with neutral polish as a gentle backdrop. Carry out dotting tool in black and white nail polish to create yin yang symbol. Apply top coat after the dots have dried for a glossy finish that will last longer.
Stained Glass Intricacy
This nail design appears like a work of stained glass artist with its multi-colored, glittering divisions defined by bold black lines. It is an exclusive and vibrant new way to bring traditional art’s elegance into the realm of modern fashion.
- Base Coat: OPI Natural Nail Base Coat
- Holographic Polishes: Several shades for stained glass effect
- Black Detailing Paint: boundaries for stained glasses
- Glitter Top Coat: To up the shine on the design
- Top Coat: Seche Vite Dry Fast Top Coat
These products were selected based on their ability to create a shiny, intricate layout that catches light just as real stained glass does.
First coat the nails with base coat and then fill sections of your nail with different holographic polishes. Once it dries, outline every section using black outlining paint making it look like stained glasses. Finally put some topcoat containing glitter for shine and complete with quick drying top coat to seal in the design.
FAQ
Q: How long can gel nail designs last?
A: Gel nail designs can last for two weeks or more with proper application and aftercare. It is important to avoid harsh chemicals on the nails and wear gloves whenever necessary to extend the life of your gel manicure.
Q: Can I do these nail designs at home, or do I need to go to a salon?
A: Many nail designs can be done at home with the right tools and steady hands. However, some intricate designs or those requiring UV curing (like gel) may be best left for salons, especially if you want a professional finish.
Q: Is nail art harmful to my natural nails?
A: Nail art itself does not harm nails but wrong removal of products such as gel polish does. Always follow the correct procedures for applying and removing them in order to have healthy nails.
Q: What should I do when my nail polish chips?
A: In case your nail polish chips, you can gently file the chip until it smoothes out at the edge then apply a thin layer of top coat on it so that it gets sealed back into place. In case of bigger chips, re-touching using similar color polish maybe required before putting on a top coat.
Q: How do I make my nail polish dry faster?
A: To make your nail polish dry faster put some thin layers of polish, use quick-dry top coats or dip them in cold water after painting. Alternatively, there are fast drying sprays that speed up this process.
Q: Are there any green options for environmentally friendly nail polishes?
A: Definitely there are several brands that provide eco-friendly non-toxic polishes packed in environmentally conscious bottles. Just look through different labels saying “5-free” or “7-free” meaning they don’t have certain toxic substances.
Q: How do I keep up with summer trends without changing my nails very often?
A”: To keep pace with trends without frequent changes, choose a design that has neutral base and can easily be dressed up with fashionable colours or patterns.